Sports Photography 101
Learn how to capture peak action with your Alpha camera, from sideline to stadium lights.
- Details
- Module
- Quiz
About this course
Learn to photograph sports action with your Alpha camera, step-by-step, using simple settings and techniques. Instructor Brad Deel will start off by showing you everything in his go-to, real-world sports photography kit. Next, you'll lock in a simple, confidence‑building camera setup with key settings for sports, followed by a full game day workflow with Brad from the sidelines. Finally, finish your images with a concise Lightroom process to put on the finishing touches – all focused on shaping light and telling a clearer story.
Course highlights
Instructor
Brad Deel is a sports photographer known for creating bold, high-impact images that capture the intensity and dedication athletes bring to their sport. He has worked with athletes across a wide range of disciplines, producing distinctive, professional-level portraits that stand out. His work has been featured by ESPN, Bleacher Report, and SportsCenter, and he has collaborated with brands such as Netflix for the Quarterback premiere, Formula 1’s Williams Racing, and Virginia Tech Athletics. In addition to client work, Brad travels the country teaching flash photography workshops, sharing advanced techniques in lighting, composition, and creativity to help others elevate their sports photography.

Brad Deel
Photographer
Featured gear
Skills
Transcripts
- Hey, what's up everyone? I'm Brad Deel and this is the Alpha Academy course on game day sports photography. Now, I am the founder of Brad Deel Sports, and maybe you've seen some of my work on social media like Instagram, TikTok, Facebook, or maybe even my YouTube channel. I'm kind of known for creating these bold, dynamic, dramatic sports portraits.
I love to use lighting in creative ways. Hopefully try to tell a story with those images and I'll use anything, whether it's smoke, gels, water, dirt, it doesn't matter. I just wanna create something that's visually appealing. Hopefully it'll get you to stop scrolling and take a look and check out my work.
But what you may not know about me is that I also love to shoot game day action. I love to be able to capture the joy, the sadness, the emotion, the chaos that is game day. You just can't get that in a sports portrait session and trust me, game day action, it just, it never gets old. And this course is designed to help build confidence in you, increase your skillset no matter where you are in your photography journey.
We're gonna give you some tips and tricks along the way and make you understand and feel confident to go out and capture these images. We're gonna talk about prepping for game day, what I bring in my camera bag, how I make sure that I'm ready in the right position. We're gonna also, obviously we'll discuss camera settings, position, sideline awareness so we don't get ran over and maybe how to read the game to be at the right place at the right time, we'll discuss how I edit these photos. And most importantly, we'll also wanna talk about not only how to shoot the action, but we're gonna talk about how to show the emotion and maybe tell a story with your images as well.
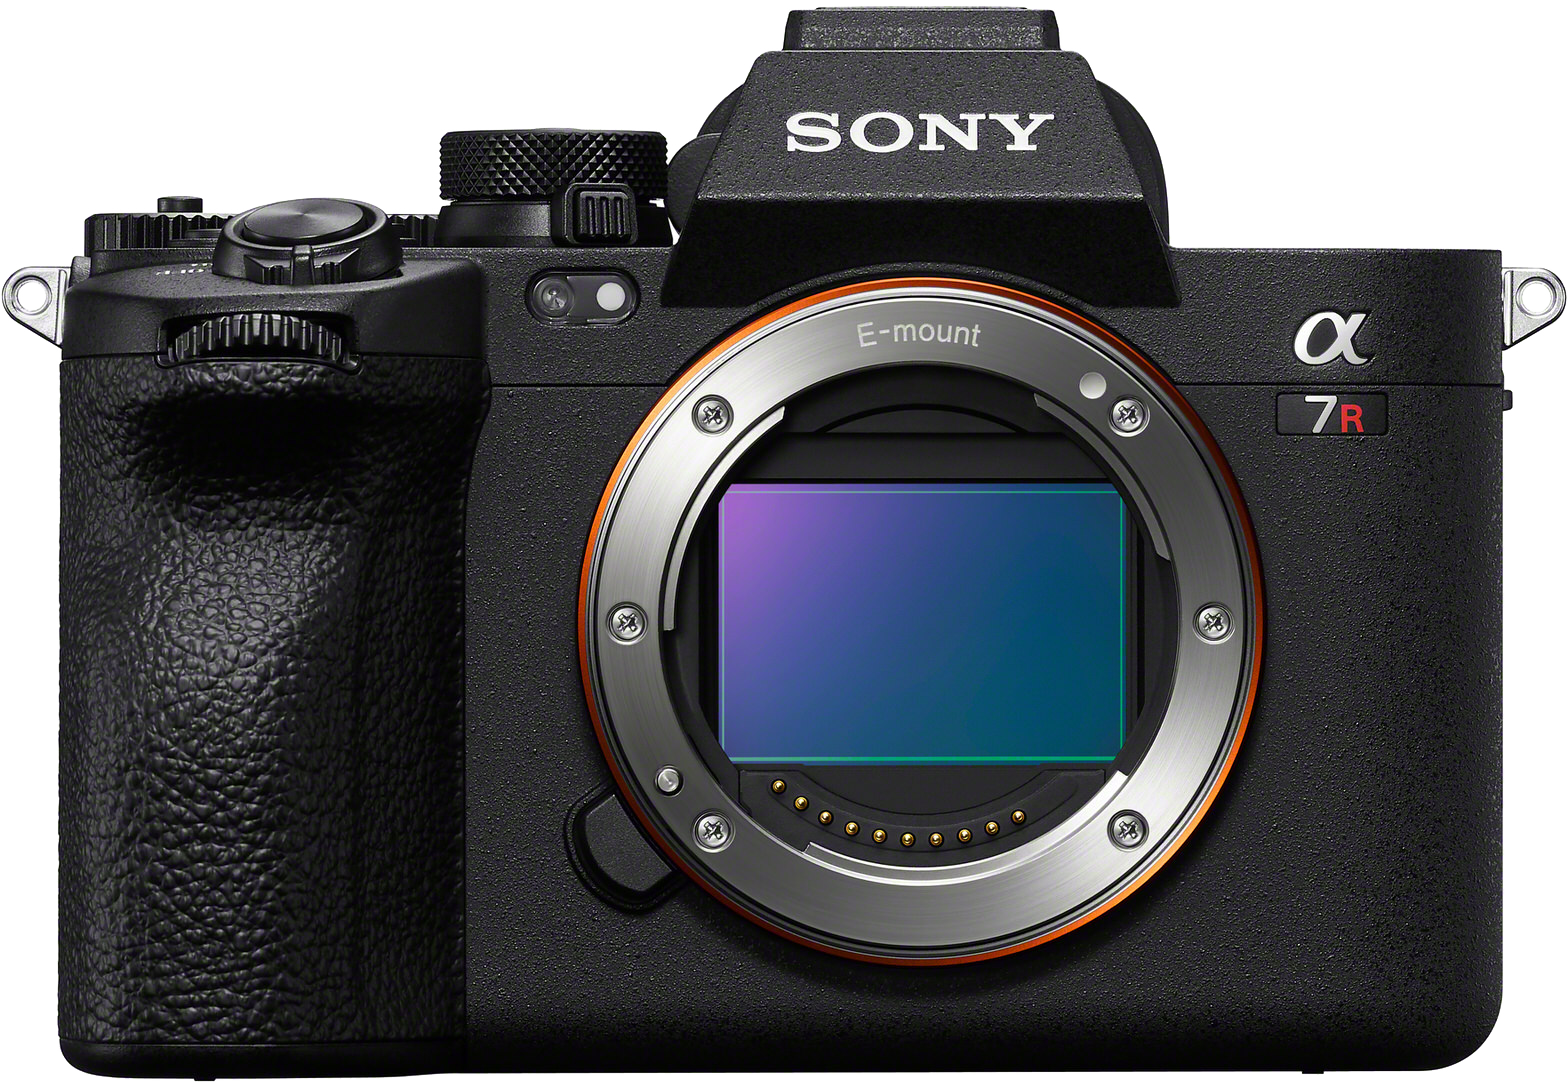
We're gonna take a deep dive into the Sony A seven R five. This is the camera that we will be using for the most part throughout this entire course. It does have 61 megapixels. It's excellent for cropping. It's fast. The focusing is excellent. So this is the camera that I love to use. We're gonna obviously talk about my lens choices here. As you can see, we have some lenses laid out, and we're gonna talk about how I can kind of quickly dial in different exposures and settings for light as it changes, especially on Friday nights where we start in daylight and we also have sunset, and then we have, we're shooting in the dark because we wanna be able to capture those game winning moments, whether it's a touchdown, a three point shot, anything that shows that raw emotion when these rivals collide. You know, we want to capture that. We only got like a split second, maybe even half a second to capture that.
So whether you're just getting started or you've been shooting for quite a while and you wanna take your game day to the next level, you're in the right place. We're gonna talk about how to go beyond the game, so let's get ready and get into it and I'll see you on the sidelines.
- Hey, what's up everyone? I'm Brad Deel, and this is the Alpha Academy course on game day sports photography. Now I am the founder of Brad Deel Sports, and maybe you've seen some of my work on social media like Instagram, TikTok, Facebook, or maybe even my YouTube channel. I'm kind of known for creating these bold, dynamic, dramatic sports portraits. I love to use lighting in creative ways. Hopefully try to tell a story with those images and I'll use anything, whether it's smoke, gels, water, dirt, it doesn't matter. I just want to create something that's visually appealing. Hopefully it'll get you to stop scrolling and take out, take a look and check out my work.
But what you may not know about me, is that I also love to shoot game day action. I love to be able to capture the joy, the sadness, the emotion, the chaos that is game day. You just can't get that in a sports portrait session. And trust me, game day action, it just, it never gets old. And this course is designed to help build confidence in you increase your skillset no matter where you are in your photography journey. We're going to give you some tips and tricks along the way and make you understand and feel confident to go out and capture these images.
We're going to talk about prepping for game day, what I bring in my camera bag, how I make sure that I'm ready in the right position. We're going to also, obviously we'll discuss camera settings, position, sideline awareness so we don't get run over and maybe how to read the game to be at the right place at the right time, we'll discuss how I edit these photos.
And most importantly, we'll also want to talk about not only how to shoot the action, but we're going to talk about how to show the emotion and maybe tell the story with your images as well. We're going to take a deep dive into the Alpha 7R V. This is the camera that we will be using for the most part throughout this entire course. It does have 61 megapixels. It's excellent for cropping. It's fast. The focusing is excellent. So this is the camera that I love to use.
We're going to obviously talk about my lens choices here, as you can see. We have some lenses laid out and we're going to talk about how I can kind of quickly dial in different exposures and settings for light as it changes, especially on Friday nights where we start in daylight and we also have sunset, and then we're shooting in the dark. Because we want to be able to capture those game-winning moments, whether it's a touchdown, a three point shot, anything that shows that raw emotion when these rivals collide. You know, we want to capture that. We only got like a split second, maybe even half a second to capture that.
So whether you're just getting started or you've been shooting for quite a while and you want to take your game day to the next level, you're in the right place. We're going to talk about how to go beyond the game. So let's get ready and get into it and I'll see you on the sidelines.
Hey, welcome back everyone. So before we head out onto the field, I thought I would talk about what I bring with me, like what's in my bag. So before we actually talk about all of the lenses and the gear that I put in this bag, let's talk about the bag itself. And my suggestion to you would be to get a bag with some wheels. I do travel a lot and I'm not getting any younger, and this gear's not getting any lighter. So a bag with some wheels is a great idea. I can stroll this thing through the airport or through the gymnasium or onto a football field. My back has thanked me numerous times, so obviously you want to get something that's very durable, highly configurable to you. But my suggestion would be to just get something with some wheels. Your back will thank you later.
Now, this very first item that I keep in this bag is something I use almost never, but it's probably the most important thing in my bag, aside from the gear itself. And that is simply an Apple AirTag. Now, this will allow me to find this gear no matter where it is. I like to keep this with me at all times. It's basically an insurance policy for me. I'm notorious for setting my bag down and then walking off or going to one end of the field or the other. And I just want to be able to find it if necessary. I hope it's something I never ever need, but if I do, at least I have it. And it always stays with me in this camera bag. So just a little insurance policy, they're not that expensive. Just a great idea.
Now the next thing I like to bring with me is, you know, we like to shoot on a lot of the softball fields and baseball fields, and that's just a really just an air duster, right? So if the wind picks up and kind of blows that dirt and dust everywhere, I want to keep my gear as clean as I possibly can, you know, helps in the editing process as well. So just a little air duster, a couple, couple puffs of this. Makes a huge difference. Always goes with me in the bag. Now I do like to shoot a lot of shots during a game. I'd much rather overshoot than undershoot.
So what I'll always like to keep with me is obviously just an extra memory card. You know Alpha 7R V has dual slots, you know, so you could always keep that with you. It's just a great idea to have. And another thing I bring with me, because I'm also, I'm notorious for forgetting to format my memory cards. That's just an external hard drive. Now this is two terabytes, you know, it's amazing how small they're making these things these days. They keep making the storage larger and larger and the size smaller and smaller. So always keep a little external hard drive with me.
And with that, obviously we need to keep a USB-C cable. Everybody has these things nowadays. So that always goes in my camera bag. And like I said, I shoot a lot of shots. I'll shoot pre-game, halftime, during the game, post-game. So I don't want to be caught dead, pun intended, without some extra batteries. The Sony batteries do an excellent job. But at the same time, like I said, I shoot a lot. So I always try to keep extra batteries with me. I don't want anything to happen that I need power during a game. And always keep those with you as well. And make sure that they're charged. That's another thing that I might've been known once or twice they forget to do.
So let's go to something that, you know, if it's kind of a cloudy day and they're getting a little bit of chance of rain, this is something, this is like maybe seven or eight bucks and all it is is just a rain sleeve that goes over my camera, tries to, to protect that gear as much as I possibly can. It's like $7. So it weighs nothing obviously, and it's just kind of a little bit, you know, if it's raining and I want to get some cool shots, especially if the lights are on and that light and that rain could be back lit. Or if the players have, you know, mud or something on their jerseys, this will allow me to do that.
But if it's not raining and it's a bright, bright, sunny day, the other thing I like to bring with me is a variable ND filter. Now this is kind of like putting sunglasses on your camera. This will allow you to darken that sky. It'll allow you to shoot at 2.8 and you may not have to be at like 1/8000-sec. or something. So this will allow you to lower that shutter speed, keep those highlights from getting blown out, allow you to adjust that to anything that you want. Like I said, it makes that sky look a little bit bluer, you know, a little bit richer, a little bit darker as well. So a variable ND for those bright sunny days also stays in my camera bag.
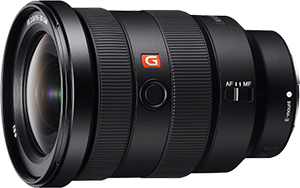
Now let's get ready and let's talk about these lenses. So the first lens I like to bring with me, always bring with me is probably not the lens that first comes to mind when you think of game day action, but it's a 16-35mm f/2.8 G Master. I love to shoot wide angle shots. I want to capture as much of a sky, let's say, or I'm in a basketball game where I can kind of, you get the athletes, get the rim, maybe get some of the fans or the, or the ceiling of the gymnasium, those lights in one shot. So a 16-35, like I said, this is the Sony G Master 2.8. It stays with me all the time. Don't sleep on wide angle shots.
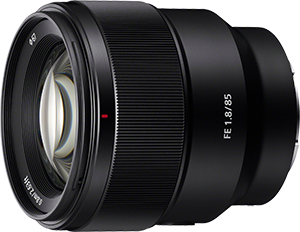
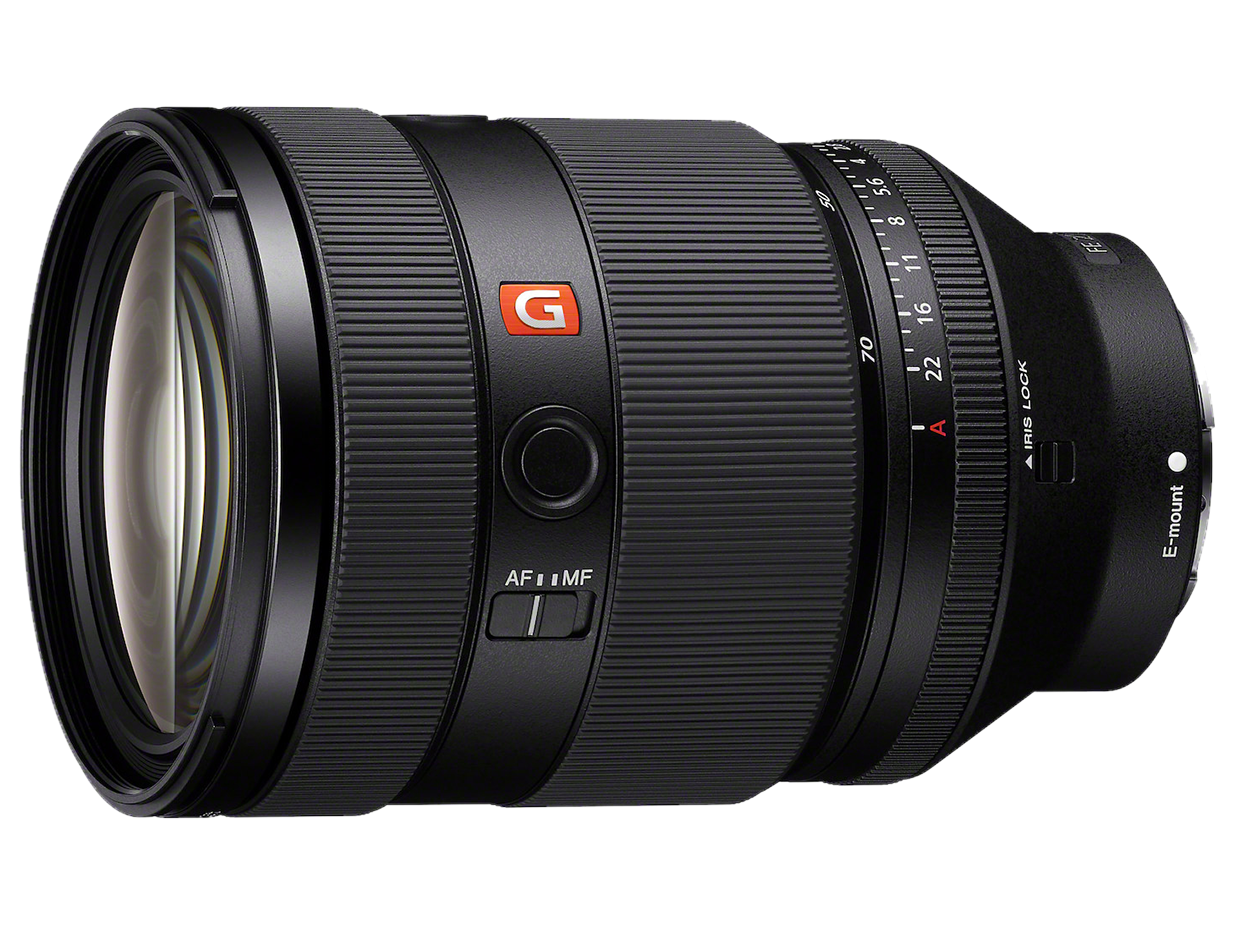
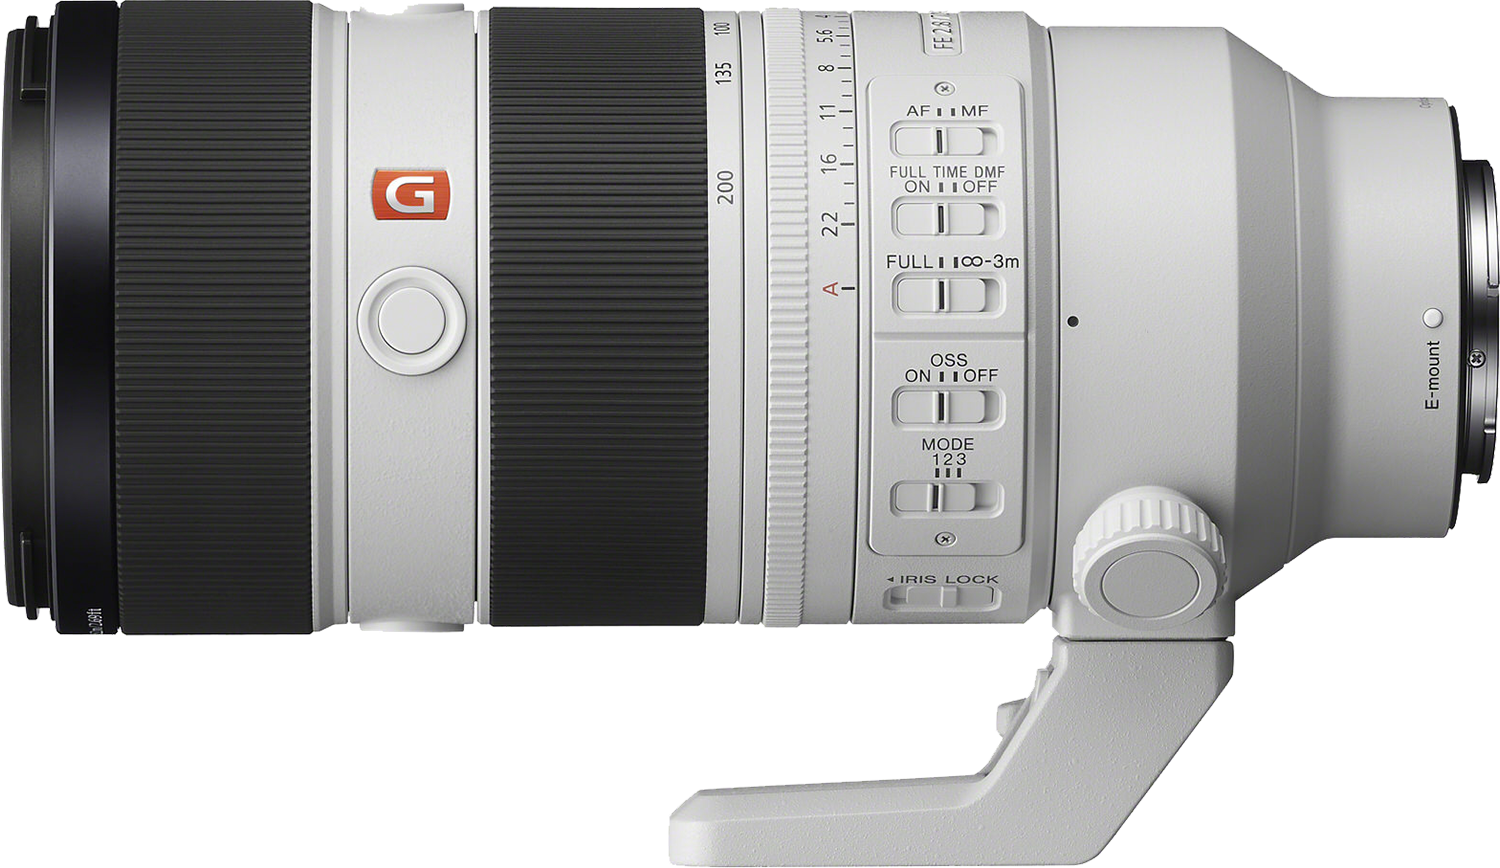
Now this next lens is an 85mm f/1.8. This is the Sony version. It is very lightweight, very compact and great for portraits before a game. You know, one of the athletes, especially the football players, have their helmets off and, and those parents can see those smiling faces. I love to get portrait shots of them. And the cheerleaders, like I said, parents love portraits of their kids and this is a great lens for that. So also goes with me on every single shoot. Now this next lens is the Sony G Master version II, 70-200 2.8. Now that's extremely lightweight. I know if you're shooting with say, with a 300 or 400mm lens, a lot of people like to use monopods, understandably so, but with this lens, you won't need that. It's so lightweight. It is an internal zoom as well.
So what you see here is what you get no matter how much you adjust, it has a very short throw. This is as big as it is. So this is probably the lens that is, is used the most by most every single game day photographer that there is because of its versatility. Going from 70mm all the way to 200 allows you to get that compression. You know, you're shooting at 2.8, you're getting some great bokeh as well. So this lens always, always, this is, this is almost a must buy if you shoot game day action is this 70-200 2.8 and and the version II is so much lighter. It is so sharp, lightweight, highly, highly recommend this lens. Which brings us to the star of the show. And that is the Alpha 7R V.
Now like I said, this does shoot 61 megapixels and it has this screen that allows us to shoot any way that we want. Now if 61 megapixels is too much, you can put it on a medium resolution, which is 26 megapixels. Or you can even put it on a small resolution, which is only 15 megapixels. So if we're worried about storage with 61 megapixels, you also have that option to reduce that to 26 megapixels. It does shoot at 10 frames per second, so you have that option as well. Dual memory card slots, so easy to use. The grip is fantastic as well. So this is the lens that we'll be using, or this is the camera, I'm sorry, that we'll be using throughout this course.
And if you notice, what I have here is I have a little clip, and what this clip allows me to do is put a little wrist strap on. I'm running up and down the sidelines constantly, you know, try to keep up with the action. And the last thing I want to do is to drop this thing and maybe lose my camera or break a lens or, or something like that. So it's just a little bit of an insurance policy. And if I do need to set it down, you know, I can easily unclip it and set it down. So this little wrist strap always stays with me in the bag. Which brings us to the last item, which is something I'm going to try out new this year. I'm kind of excited to, to try, because like I said, I do bring two cameras with me. I like to have that wide angle on my hip. And I had that the zoom with me at all times.
And that is called the spider holster. Now what this does is this allows us, you know, like it goes around our waist obviously, and allows us to put our camera on our waist just to the side right there so we can have easy access to it. Now, I'm not worried about it falling out, it won't do that. Or you can even lock it into place so that it can't come out and then easily unlock it. So this item, I'm really excited to give it a try this year, see how that does, because like I said, I do shoot wide and I do shoot close. You know, if an athlete comes at me really quick, I can grab that 16-35 and hopefully get the shot. So these are the items that we'll be using on game day. We'll see you on Friday night.
- Hey everyone. So before we head out onto the field, I thought it'd be a great idea to go over the camera settings that I kind of like to use, a couple things I want to do to the camera itself. Maybe a thing I like to do on the lens itself. Once we get outdoors in the sun, it's kind of hard to see this information. So I thought in here would be the best way to do that.
And let's go ahead and get started with by going to our menu. All right, so we hit our Menu button and we're starting on the main right here if you can see. And, and we go down to the purple section, which is our Autofocus/Manual Focus. And if we go over, just by pushing to the right, we can check on our Focusing Mode, right? So what we want to be in is we want to be in Continuous Autofocusing. We don't want a Single Shot or we don't want Automatic. We want it to continuously be looking for that subject so that it stays in focus.
So if we go down from there to our Tracking Sensitivity, we have these different modes as well. So if we're doing like a portrait or something like that so that it's not really moving, we can use like a Locked On, which is number one. Your camera probably comes in as standard mode, which is kind of a balancing act that it does. But for sports like football, basketball, some of these different sports that are, that are very intense, high speed, I want it to be in Responsive. I want it to be looking as fast as it can to keep up with that subject. And then from there we can also go to our Subject Recognition.
So we want to make sure that it's On, our Subject Recognition is On. And then the next thing we want to do is we want to make sure that it's on Human. This particular camera, the Sony A7R V will not only do humans, but it will do animals, it will do birds, it will do cars, trains, insects, all these different things that it will focus on and look for the eye of - but obviously we want to be on Human. So make sure that that's also checked.
Now from there what we can do is we can go and hit our Fn button. So there's our Function button and we talk about our Drive Modes. And we do not want to be in Single Shot mode. We want to be in High Speed Continuous. We want to try to get those 10 frames per second. If you don't want 10 frames, you can put it on high, you can put it on low. But me personally, I want to be in high speed plus, you know, if someone fumbles the ball or if there's going to be some sort of dramatic catcher as the ball is knocked out of the air, I want to capture as much of that as I possibly can, you know, to kind of help tell that story that we talked about. So we want to be in High Speed Continuous.
And as far as our, our Focusing Modes, we have Wide, you know, like I say, we hit our Function button, which brings up the Focus Area, we have Wide. So what Wide does is anything that comes within our frame, it kinda looks for and it tries to find that face. The Sony A7R V has one of the best focusing cameras that there is on the market today. They use this skeletal system where it knows where the head is at all times and tries to find it, even with a helmet on it tries to find where the face is and focus on it.
So we have Wide, we also have Zones, which is basically that you can set it up on one particular area of the camera and that's where it'll focus on. And we have Center Fixed focus. So Center Fixed focus is just that, anything on the left or to the right, it doesn't really look for it to try to focus on. It tries to focus on what is in the center of your frame. So if you are not worried about anybody being on the rule of thirds and you just want to capture that person in the center, then you could put it on that. However, if you are off like, oh, I had somebody in the top right or top left in my corner, that was a great shot, it may miss it. So just keep that in mind.
You also have this Spot Focus feature which allows you to just put it anywhere you want as far as focusing goes. So if you want someone to just be on that rule of thirds, for instance, and you want everything to be blurred to the side or one side or the other, you can put it on that. Just make certain that whenever you focus to shoot that shot, but that's where your subject is, that they're in that rule of thirds or wherever you put it. So there's something else to keep in mind. I want to keep mind on Wide, anything that comes into that frame, I want to be sure that it's in focus. So I keep it on Wide.
Now let's talk about the focusing. The way I focus, I love to use Back Button Focus. This AF-ON button is how I like to focus. Now you can also push the trigger down halfway. They both do the exact same thing, but I don't want to accidentally push that trigger down more than halfway and maybe take a bunch of unnecessary shots that I don't need that I have to cull later. So if I'm, I'm constantly Back Button Focusing that way it's always looking and I save that trigger finger for just whenever I want to take the photos.
Now we can talk about, I'm in Manual Mode obviously and my camera settings- so what I like to be is I want to be at 2.8. And the way I control that is with my index finger. This is how I control the F-stop is just by moving my index finger. So I keep that at 2.8. Now for these sports, especially football for instance, I want to be at a minimum of 1/1000-sec. And that is the bare minimum. I don't want any motion blur if I can help it. If you sing, you get motion blur at 1/1000, try to go up to 1/1250 and even higher. Like I said, it's really simple, that's how you can adjust these things so quickly and you just hear at your thumb. And that will adjust your shutter speed. Index finger, F-stop. Thumb will be your shutter speed.
Let's talk a little bit more about ISO, which refers to how sensitive the camera sensor is to light. And you can turn this up manually as the conditions change. Or you can use the Auto ISO feature, which takes care of it and works really well. Like I said, with ISO, that's going to change throughout the game because we may start in the daylight and as it gets darker and darker, you know that ISOs going to have to go up. Don't be afraid to push the ISO. The Sony A7R V can handle it. You don't have to worry about noise like some of the cameras in the past. Don't worry about that.
Now, in the particular field that we're shooting at, as it gets darker, I may even switch to Shutter Priority. Now, Shutter Priority, what it will allow us to do is basically just set our shutter and no matter what we change, whether we use our thumb or we use our index finger, all it does is change the shutter speed in Shutter Priority. Because that's really all we're controlling. The camera's doing everything else.
So like I said, in the middle of the field at night where we'll be shooting, it's a lot brighter than in the end zones. It's probably almost two stops of light difference from midfield to the end zone, especially the back of the end zones. It's just not lit as much. So if you put your camera in Shutter Priority, you set it to 1/1000-sec., let's say - it will keep it at 2.8 and it will adjust the ISO accordingly. If it's really, really bright and you're still at 1000 and it needs to change that F-stop from 2.8, it will do that as well. But since we'll be probably be shooting underneath the lights, it will stay at that 2.8, and just adjust the ISO.
If we're moving up and down the sidelines really, really quick, we don't have to worry about it. We just, Shutter Priority. We take the shots at midfield where they're going to be brighter with a lower ISO, we go to the end zone. It's going to bump up that ISO, but that shutter speed will still remain. Our images will still say sharp, but the only thing that will change is the ISO. So that's another thing we do. Now also to help focus is on the camera lens itself. There's something you can do and you have what is here is a Full, and you have a three meters to infinity. So if you change that from three meters to infinity, what you're basically telling this camera is don't worry about focusing on anything that's within roughly 10 feet in front of me. With 70mm, 10 feet, you know, in front of you - it's almost too close anyway.
So now that we've got our camera set up, we've got our settings ready, let's head to the field and get ready to shoot some game day action.
- So it is finally game day. I am here early. I'm about an hour, 15 minutes or so early. They've got the music blasting and the players are starting to get warmed up. So I like to get here early to kind of check out the lighting of the field.
Now we've got some great clouds this evening. So a couple things we're going to keep note of. First of all, you can see this dotted line goes all the way down as photographers. We stay on this side of the line. We want to keep ourself safe. Secondly, there'll be other photographers here as well. We'll be mindful of them, they'll be mindful of you.
Third, we're going to shoot wide open, right? So we're going to shoot at f/2.8. If you've got something at F/2, 1.8 use that. We're going to let in as much light as possible. We want to create that bokeh as well. Third, our shutter speed, right? We want to be a minimum of 1/1000-sec., preferably higher. Our ISO will change throughout the game. As the light dims, the ISO will go up. So you can't just set on one particular ISO.
As also stated, as it gets dark, the middle of this field is brighter than the end zones. We will probably switch to Shutter Priority it's keeping that shutter at that 1/1000-sec., 1/1250-sec., and letting the camera itself determine the ISO so that we as photographers want to keep up with the action, not have to worry about the camera. These cameras do an excellent, excellent job.
Third, we're going to get low. We're going to shoot low, and we're going to angle up to give that hero shot. So, and we're also going to try to look for emotion as to as, as the game goes on, we're going to look for these players, whether it's joy, sadness, anger, because it is an intense game. So we're going to keep an eye out for that. We want to tell a story as we go.
So we're going to do some portraits of these girls and we're going to use the sun to have a little bit of light on them so they're not in shadow. OK? This particular shot, I'm using the sun to light her face, having her turn her head slightly so that she's not staring into the sun, but we're still getting great light on her face.
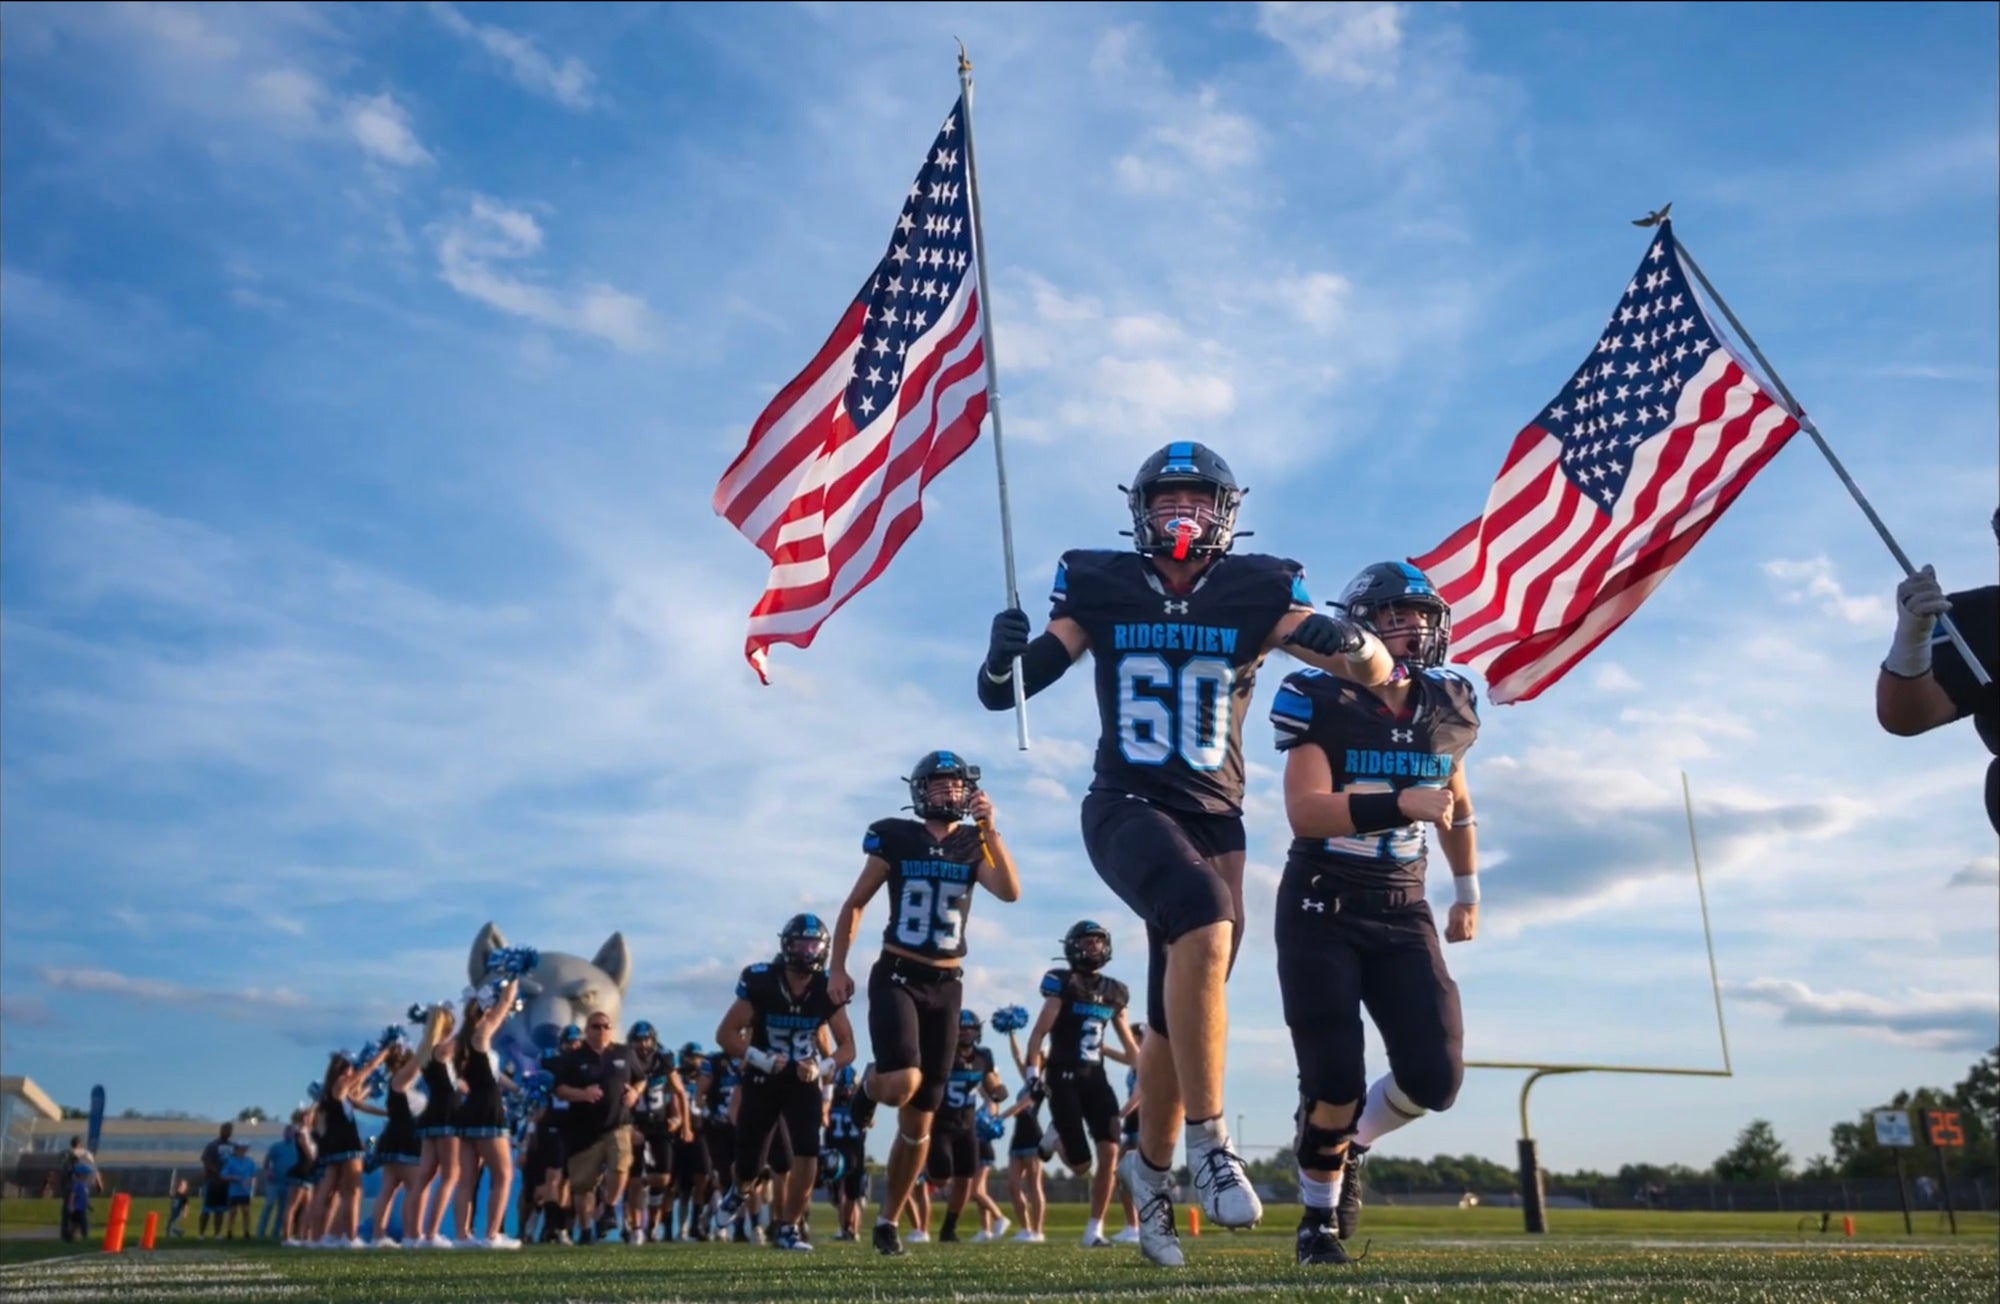
In this second shot here, I'm getting low, I'm shooting in the sky. I want these players to look as big as possible, trying to get the coin in the air. This is an emotional part of the game for these athletes. They love running out of the tunnel. I'm shooting in a very high burst mode to capture as much as I possibly can because they are running by so fast and I want to get that flag exactly in the center of my screen. So this allows me to do that.
OK, now the game has kicked off. A few things to remember, things we want to keep in mind: First and foremost, to get the best shots, we're actually going to try to stay 10 to 15 yards in front of the offense. Secondly, you want to try to get ball, you want to try to get jersey number and face. Those are the best three things to get in a shot. Fourth, if you can get ball, jersey, face and the player jumping or something like that, that's just an added bonus. So those, those are some of the things we're going to be looking for.
We're going to go down here, get set up and start shooting. I'm shooting in a very high burst mode to capture as much as I possibly can because they are running by so fast. OK, so what we've done, we've actually switched sides now. The sun is sitting over here in the first quarter of the game. We were on that side using the sun to light the players.
Now what we're hoping for is to have a really nice sunset. So we've swapped sides and what we're going to do is get ready and take some shots. I'm going to use my 16-35 to show as much of the sky as I possibly can. And let's see what we get. We've got this really nice sunset. So I'm actually under exposing the sky a little bit and I select my player and bring him up in post.
So that is a wrap on the game. We tried to shoot wide, we shot close, we shot portraits. We shot action shots. We tried to get that ball. We tried to get the face, we tried to get the number. We tried to get athletes in the air. We shot in Manual Mode. We shot in Shutter Priority. We kind of let the Sony A7R V do a lot of that the work for us. We shot at 10 frames per second. Now, one thing to keep in mind is don't be afraid to overshoot. It's better to have five or 10 frames, too many than to have that one frame that you need, that you don't have enough of. So keep that in mind whenever you're shooting. We stayed low to try to get those hero shots.
So stay tuned. We're going to go in and we're going to edit some of these photos from tonight's game, and we'll see you next one.
- Hey everyone. So now that we've shot our football game, let's go ahead and let's edit a few of these images.
I've selected five images, and what we will do is I've tried to select different images for different reasons. So I selected a portrait image. I tried to select one where I'm trying to show like the sky and I try to really show one, how we're really underexposed and the power of RAW and what you're able to do with that.
Now I always shoot in RAW because that particular format gives me the most information possible from this sensor. Now it does require you to process it, but it gives us the flexibility for like, in game situations because the light is constantly changing and whether we underexpose or overexpose, we have that possibility of saving that in our post-processing. I selected an action shot and I tried to select an emotional image.
So I tried to run the gamut of what we can do here with these five images. So let's go ahead and start with our first image, it's a cheerleader. This is one of those that we shot when the sun was setting. We've got a lot of nice light. This is the way the shot is, it is in RAW, haven't touched this image.
Now I love to use Lightroom to edit my photos because they can process RAW, but there are a lot of other programs out there with very similar controls that can do the exact same process. And my editing style will vary. I never really start from the top. I work my way down or from the bottom, work my way up. I just look at the image and I think, OK, you could use this or that. And I work my way from what I think needs addressed the most to what I think needs addressed the least. So this is kind of the way that I work. You'll develop your own style obviously.
So I want to reduce the texture and clarity. You know, we have a cheerleader we want, that nice, soft look for her. Let's give a little bit of vibrance. We don't have to do a lot with this and because this, you know, it's not a bad image to start with. So we have really good lighting so that makes a huge difference.
One of the things that I like to do is go down to this calibration section on the right hand panel there and go down to the blue. And on the saturation of the blue, I tend to move that just a little bit as it really brings out the blues and it actually warms the skin tones as well. So I found this slider is something that I will probably use in 90% of my images. So now that we've done that, let's go ahead and add a little bit of a vignette to draw those, the eye right to our subject. And then maybe we can just raise the shadows just a little bit on her and maybe list a little bit of contrast to make that dress a little bit darker.
Now we do have a couple places here that we could bring into Photoshop and touch up. You know, they're just a little bit too hot, but we'll save that for another time. I'm not really going to do a whole lot else to this particular image. We're going to kind of call that good for the most part, just a little bit warm right in here. We can maybe do a little bit of a radial gradient, drop those highlights slightly to bring those back. So let's call this one good, and let's move on. Now on this next shot, what we've got is whenever the athletes were running up to start the game. As you can see, what I've tried to do is I tried to expose for my sky to get it the way that I want. And then the athlete, as you can see here, they are in deep shadow. So this is something I want us to correct in post.
And one of the reasons I selected this image is to show you what you can do. So let's go ahead and get started. Let's start with our sky. So we have some nice color here. We can actually maybe just get a little bit more saturation to that sky, a little bit bluer and we can add a little bit of texture and clarity to that image as well. That sky doesn't look bad at all.
Next what we can do is we can select our subject. because like as we spoke before, our subject here, they're very dark in shadow because the sun where it was in relation to them, plus them having a helmet on. So let's increase our exposure of them and we can start to see a little bit of that detail coming back. And if we raise those shadows now we can start to see a little bit more of the face. If we take our brush tool and just kind of go around the face of our athlete, maybe this one too, just a little bit, and we increase that exposure, there we can kind of start to see a little bit more of our athlete's face. There, we can kind of see what we've got. And now that we've done that, we can start editing the rest of the image.
One thing I need to do and always encourage everyone to do, is to make sure your image is straight. And as you can see here, clearly I was way off so I wanted to make sure that that image is straight. I want to get our flag basically in the center of the screen and there was our crop. So we have that available to us. Let's take advantage of it. And again, go down here to our calibration tab with our saturation of our blue slider and let's just add a little bit to that. And there we go. And you could also go to our reds if you want to do the reds of the flag, you know, saturate those more if you wanted to do that as well.
And one last thing I might do is let's just make a giant radial gradient right here just to kind of draw your eye a little bit more into the center of the image. Just increase that just a little bit and that kind of lets our eye be drawn to the brightest part of the screen. That's where your eye will always tend to go to the brightest part of the screen. So that's one way you can manipulate people before you want them to look first on your image.
So now that we've got this image done, let's move on. Now the reason I shot this image this way is, it is getting towards sunset and I wanted to show, like I said, the power of being able to shoot in RAW. If we overexpose that sky and we blow out those highlights, you will not get that in information back because all the detail is lost. What is in shadow, a lot of times there will be some noise, but you can bring a lot more of that back than something is blown out completely.
So let's get started here. Let's go ahead and well, like I said, we want to make sure that we're nice and straight. We've got that. And let's select our sky. Now as you'll see, I love to use masking. It lets me select part of the image to edit. You know, there's other programs, not just Lightroom that has this available and it allows me to mask for the sky, it allows me to mask just the subject. There's different things you can do with masking as you'll see through this editing process. So now we've got our sky selected with our masking tool. We can warm the sky up, we can cool it down, we can do all these different things. So let's warm it up just a little bit, maybe at a slight bit of magenta, not a whole lot. We can bring those highlights down if we wanted to. Something like this, you know, add a little bit of clarity and texture. We don't want to overdo it just a little bit. Maybe little bit of saturation as well.
So like I said, this is something you can play with to get it any way that you want. Now that we've done that, what I want to do is I want to select my subject, which in this case will be our helmet and football. Now I'm going to actually go ahead and bring up that exposure on those, see how much we can bring back under exposed, like that. You can bring that back. Look at that helmet from where we were to where we are now. So there we go.
Now we can look and see what that is masked we can, you can also go in on this and you can subtract if it doesn't get everything that you want or gets too much that you want, you can subtract from your mask if it misses some information. So let's just, I got a little bit in here that we've brightened up that we don't want right now. So we'll do that.
So now that we've got our helmet and stuff brought up, let's focus on our football. Let's go ahead and let's see if we can add a little bit of color, bringing back some details on this football as well. Let's warm it up just a little bit. That's add some clarity and texture on these, on certain things where you have a lot of detail. Don't hesitate to play with that clarity and texture. They can really make a difference to your image. So don't hesitate to play around with it, don't overdo it, but don't hesitate to play around with it.
So now that we've got those brought back from where we were, let's focus now on our grass. So there's multiple ways we can do this here. I'll be using a radial gradient, which is either an oval or a circle shaped mask that allows you to edit the center of the image a little bit stronger and it falls off along the edges of grass. And we can add some green to it or some saturation to kind of bring a little bit of that information back. So now we're starting to see a little bit of detail there. Now one other thing we can do is we can grab our brush tool and on the sideline stripe here, w
e can maybe hit that just a little bit. So we can select those with our brush tool, maybe bring back the whites a little bit. You know, we, like I said on this, if I was editing this, I'll take a little bit more time, a little bit more detail. But there we go on that. Now the one thing I do want to do that is bothering me and I'll use the remove tool. So you've got this, I'm not sure exactly what this is, but let's just go ahead and remove that. Let's try to get something relatively close and there. Now we've got that removed.
We can go ahead and edit the entire image now because we haven't even touched any of these sliders, as you can see. Everything we've done has been just simply masking so far we haven't touched any sliders at all. So now we can go ahead and add a little bit of clarity to this whole image. Maybe we want to add a little bit of vibrance to it as well. If we even want to saturate it, right? We can do that. We can add contrast, we can take it away. So once we get this all done, like I said, we'll go back down here to our calibration with our little saturation tab that I like to play with a little bit. And we can see if it does anything on this. There's not a whole lot of blues in this particular image, but it's OK.
Now I want to do one more radial gradient over this and just a little bit of exposure to it. And there we go. And to me, this image is about done. So this is where we ended. Now if I hit the reset button, you can see where we started. You can see the difference, right? Now we can go ahead and we can undo that and put everything back. So just because you underexpose something and that you think, oh no, this shot's no good. RAW just allows you to bring back so much information, a lot more than you may think.
So now let's go on to our next image. This is the one where the kid took a little bit of a turn. So what I want to do first, obviously we want to try to straighten the image, but I want to draw your attention to our player, right? So we can see here, let's, let's actually bring it in a little bit more. How about that? Let's just focus on these right here. And this is where the power of that 61 megapixels comes in. It'll allow us to really crop in on our image.
So now that we've got that, another thing you can do a lot of times, and we'll just do it for here for just for to show is you can hit the auto button and see what kind of edit that it gives you. And on this particular case, it didn't do a bad job at all. So we can maybe add a little bit more contrast to the image, see what that does. It kind of separates everything from everyone. We can add a little bit of clarity and some texture to it. And like I said, I go back down here to my best friend and just add a little bit of that to it so we can put a little bit of a vignette to draw our eye into our subject.
And there we have it. Now you can use a de-noise tool if you want. This is ISO 640. I think for social media purposes and print purposes, this is excellent. So there's that particular image. Now let's go on to our emotion type images. A lot of these images I personally like to do in black and white. So the first thing I'm going to do is crop this image the way that I want. I don't want all this, I want my focus to be on this coach and what he's saying to this young man. So let's bring this crop way in, shall we? Let's fill our frame.
That's another thing I like to do. I like to fill the frame. So now it's already a lot more interesting image. We're brought into the image by doing this. And now like I said, let's just go to make this image black and white. There we go. Let's add a little bit of texture and some clarity like the blacks come down just a little bit right there. And what we can do is take a radial gradient, let's just say, and let's just add a little bit more light on our subject, on our coach here. And maybe we'll do one more time, just a little bit. Maybe raise these shadows slightly. So there we go.
Now I will probably go ahead and add a little bit of a vignette to this to draw you in a little bit more. And let's do one more giant radial gradient over this center of this image. And let's increase the exposure just a little bit. Now, there we go. So this is the way I would pretty much edit this image. I find it to be a lot more interesting to do it this way. Another thing you can do, especially with these black and white images, is you can go a little bit more with the clarity and the texture. You know this coach, I think he probably can handle it pretty good. So you can kind of make him look a little bit more like a grizzled veteran, right? So there we go.
So I try to say select five completely different images to show you the way that I would edit these. The way I try to tell a story, you know, from black and white to color, to portraits, to shooting low, to exposing for my sky and and then bringing the other stuff up in post if necessary. I hope you enjoyed this. So the most important thing to remember throughout this course is just go out, have fun, go out and shoot. Just practice and be sure and check out more on the Alpha Academy. Til next time, we'll see you.
Rate this course
Your feedback helps us improve our content.
Course rewards
Complete any course and earn a unique badge to celebrate your progress. Collect them all as you level up your skills!