Christopher Byler (@SeaBylerPhotography) is an Army Veteran who enjoys diving. In recent years, he has begun photographing his experiences, particularly capturing wildlife encounters he has while diving. Byler states that “working behind the lens has allowed me to share my memories with others and ultimately spread awareness to some of the more misunderstood wildlife out there.” We sat down with Byler to learn more about his work and the story behind this image he captured with the Sony Alpha 7R III and Sony 16-35mm f/4.

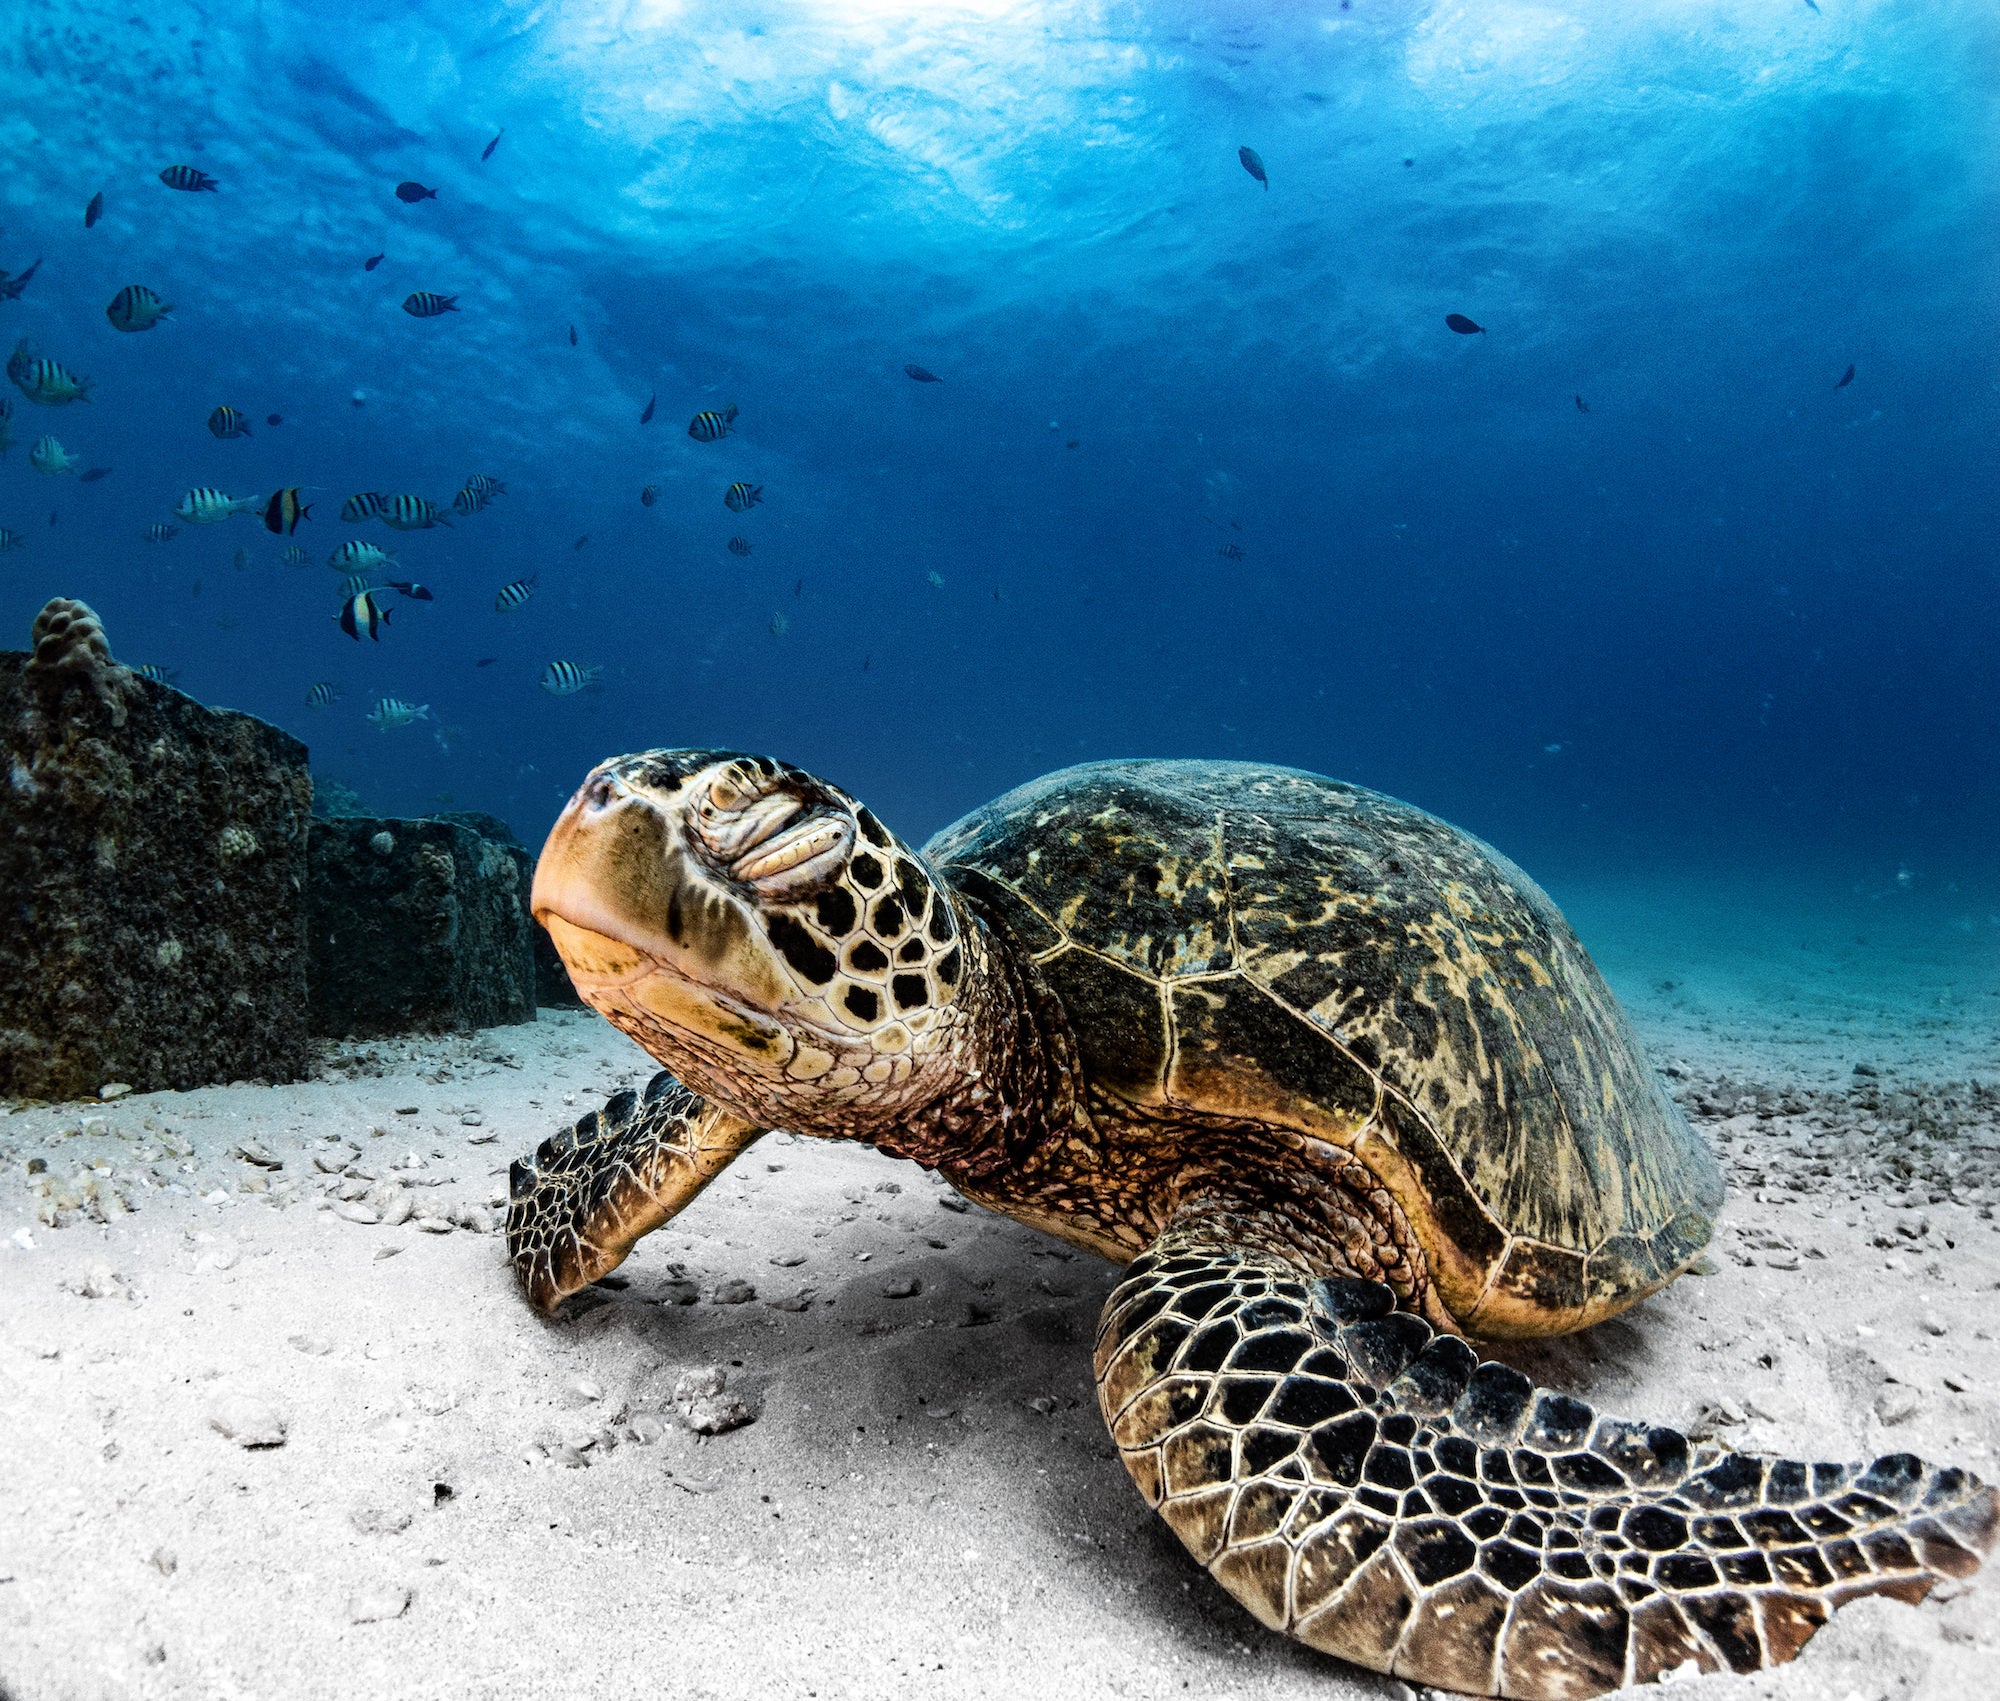
Photo by Christopher Byler. Sony Alpha 7R III. Sony 16-35mm f/4. 1/125-sec., f/8, ISO 100
Army Veteran Christopher Byler has begun photographing his diving experiences - learn how he took this shot with his Sony Alpha 7R III and Sony 16-35mm f/4.
The Scene
I was diving at a popular site in Oahu Hawaii (Kahe Point, known as the “electric beach”) where there are numerous resident green sea turtles that can often be seen and are very accustomed to divers which allows for personal encounters. It is however important for divers to maintain a safe and legal distance to these animals. I have visited this location many times and my intention for this trip was to photograph white tip reef sharks or possible passing manta rays, but the turtles are usually a solid fallback.
Getting The Shot
As the sun came up one morning I scavenged the area searching for my target species of sharks and rays, however this proved to be more challenging than I had anticipated because the visibility was less than optimal. There was a lot of floating sediment and a strong current that provided a haze that made finding wildlife tougher than usual. I managed to find a sleeping sea turtle under a ledge but opted to leave it alone to rest. As I wrapped up my dive, I headed back to the main dive site to which I found a very inquisitive turtle that I have photographed numerous times before. I likely have taken thousands of images of this same turtle but I never pass up an opportunity to add to my collection. I positioned myself at the surface about 30 feet down current from the turtle who was laying on the sandy bottom around 27’ down. I began “breathing up” to prepare for my first dive and set my camera settings accordingly.
Since I dive this particular site very often I already have an idea of my typical settings for this situation with sea turtles. I always use continuous autofocus and continuous shooting so that I can capture small moments in between movements of my subject. I set my shutter speed to 1/125-sec., as I know that the turtle will be either stationary or moving very slowly, but sometimes I photograph while swimming and moving around so I still want to be able to freeze the action to include the fish swimming in the background. I left my aperture at f/8, which is what I typically leave it at for the majority of my underwater images unless I am hurting for more light or I am doing split shots. Finally, I leave my ISO at 100 then adjust that manually once I make my dive to the bottom to adjust for the change of lighting as I dive deeper. With the strong surrounding current and the tides changing, warm clear water moved in allowing for much better visibility than the earlier morning had offered me.
I took my final breath, and submerged to the sea floor pointing my camera to the sea turtle and waited for the right moment. The turtle noticed me in his line of sight, likely saw its reflection on my dome port, swam right over to me, and paused to take a long look. Being in what I felt was the prime spot I composed my shot with the beautiful blue water in the background and white sand beneath the turtle. I fired off a series of photos at which point the turtle closed its eyes, giving the appearance that it was either sleeping, or blinking which I thought made it unique from all my other images I have captured.
The Gear
I took this image with the Sony Alpha 7R III and Sony 16-35mm f/4 lens in a Sea Frogs Underwater Housing. After shooting for a few years with a Canon, I made the transition to Sony after some fellow photographers spoke very highly of their performance. I went with the Sony Alpha 7R III for the high resolution 42 megapixels, enabling me to crop images while maintaining enough detail, as well as being able to print large images for display. Another feature I am fond of is the high frame rate that helps me not miss any crucial moments as I fire shots away with certain species of animals. I have been blown away with the overall performance of this Sony camera.
The Edit
Whenever I take underwater photos I set my camera to auto white balance. With that, I always go into post processing knowing that I will have to manually edit that to get the correct white balance to make the colors correctly portray what I was trying to encapsulate with my photo. I do all my editing in Adobe Lightroom and only edit RAW files so that I can have maximum information and can really bring out the fine details. After the white balance has been adjusted I'll create an “S” curve to adjust my highlights, shadows, exposure and contrast. I do not have a specific editing style per say, I just like to make the image look like how I felt in the moment that I captured it.
Once my tones and colors are where I want them I’ll do some finishing touches like brightening up the color of the sand and giving it a more white appearance since I lose some of that using ambient lighting. When the image is where I want it, I will finish it off by doing some spot healing to remove any potential distractions like floating debris or sediment.
See more of Byler’s work on his Instagram @SeaBylerPhotography.


