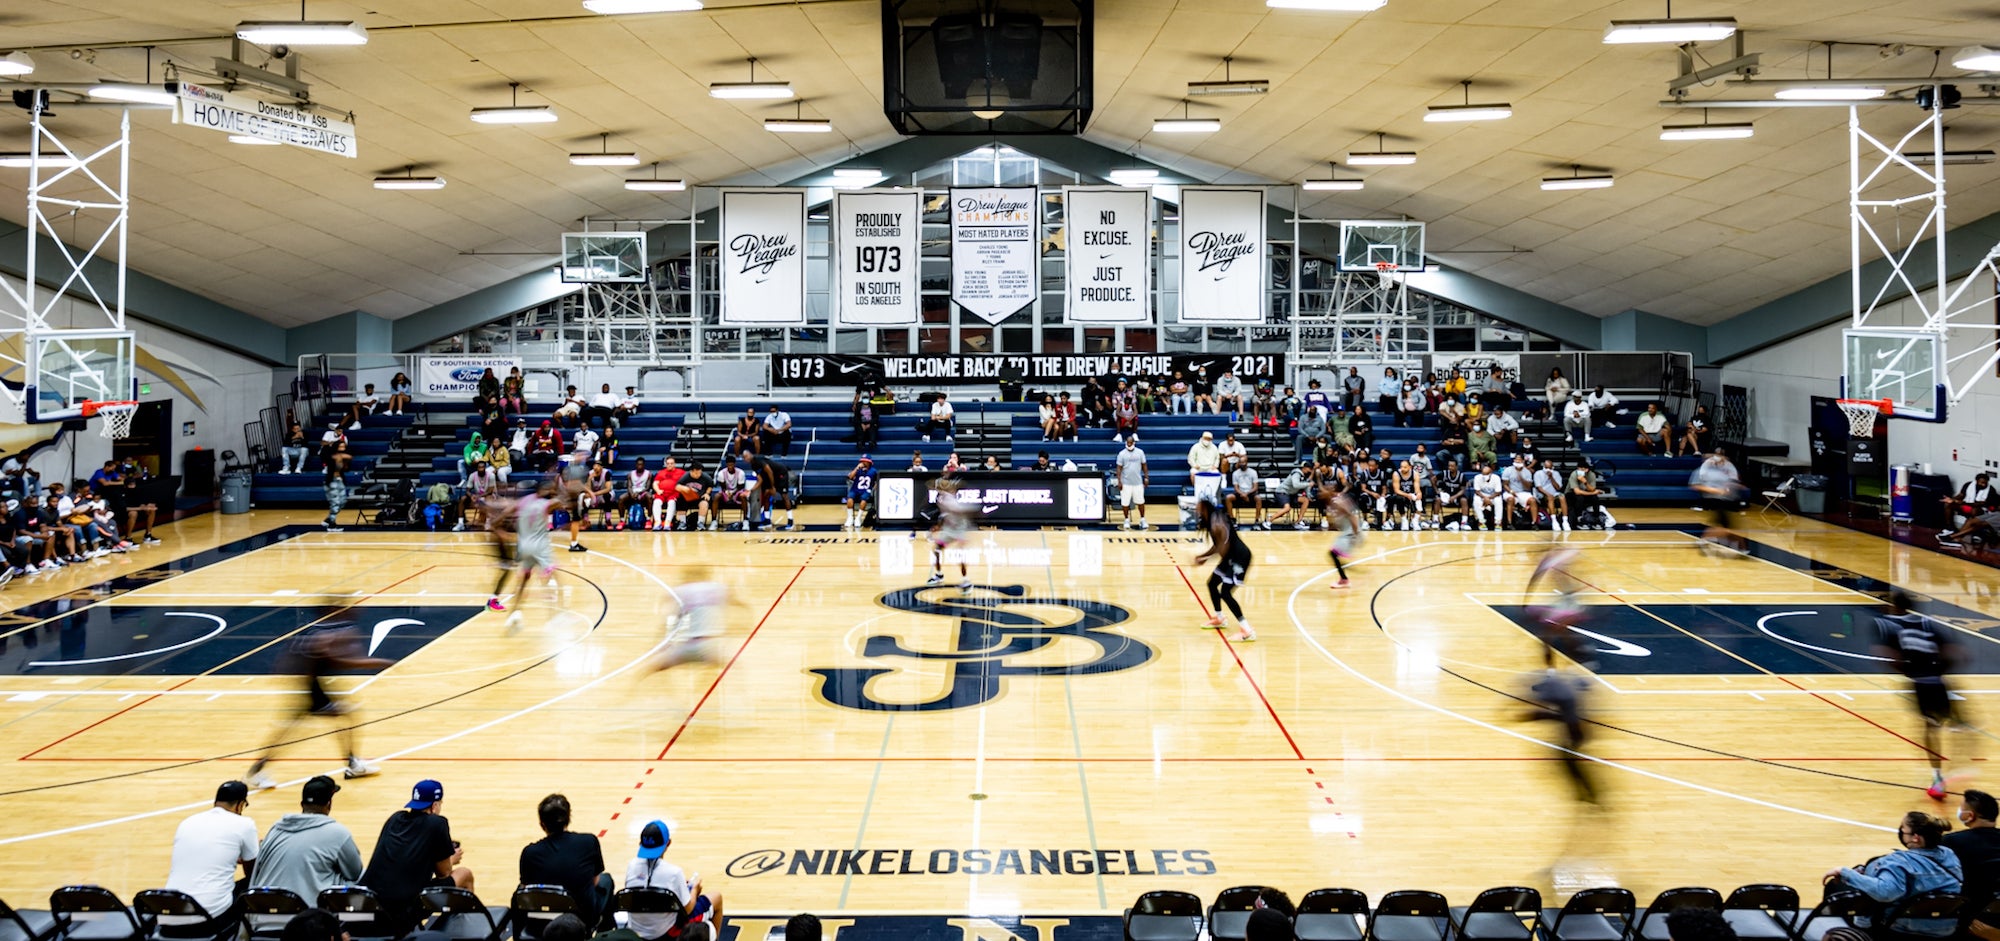
Travis Ellison (@travietrav_dmv) spent several years working as the photographer for several professional football teams before moving to freelance in sports photography full time under his company, Travis Ellison Productions, LLC. He travels around to various sporting events with his gear, always looking for a creative way to capture the game. We saw this full court motion blur image he captured and connected with him to learn more about how he captured it. Read the story behind the shot below.

Photo by Travis Ellison. Sony α1. Sony 24mm f/1.4 G Master. ⅙-sec., f/6.3, ISO 400
Sports photographer Travis Ellison details the story behind how he was able to capture the entire court with the Sony Alpha 1 & Sony 24mm f/1.4 G Master.
The Scene
This image was captured at Saint John Bosco High School in South East Los Angeles, California. I was in town to shoot an AAU tournament down in Irvine, California, but I saw that the Drew League had their final regular season games the same weekend I was going to be in town. I’ve wanted to photograph the Drew League for years upon years and the stars finally aligned with this opportunity to shoot the league. I applied for a media credential to cover them.
The inspiration behind this specific shot came to mind while sitting on the baseline shooting the games. There were multiple games that day and I sat in the same spot on the baseline for almost the entire day. I kept a focus on incorporating the Drew League banners and Nike branding in my images as the night went on and I thought to myself, it would be awesome to get a shot of the full court with the banners showing and the players blurred to imply motion.
So as the final game of the night was coming to a close, I walked up to the top of the bleachers and as I was packing up my gear, I set up for this very shot that I had been envisioning all day long.
The Gear
I used the Sony Alpha 1 paired with the Sony 24mm f/1.4 G Master for this shot. I am in love with the image quality produced from the Sony Alpha 1. It’s the best camera I currently own and for this shot I wanted the high megapixels to work their magic by creating a very detailed shot. I was originally going to use the 50mm f/1.2 G Master for it, but I wanted to make sure I captured both basketball hoops in the image so I had to go wider. Using a prime lens definitely helped with the sharpness, the new G-master primes from Sony are amazing and I love the quality of them. The higher megapixels will also be great incase I want to print this image, or if I decided to crop in closer to create more than one perspective out of this one image while maintaining great detail within the crop.
The Shot
Once I attached the 24mm f/1.4 G Master lens to my Sony Alpha 1, I immediately dropped my shutter speed and increased my aperture for two reasons. Lowering the shutter speed would increase the blur effect and brighten the exposure, while increasing the aperture would allow more of the scene to be in-focus while darkening the exposure to bring things back to an even, naturally lit scene. I then used ISO to do final exposure adjustments. I wanted my ISO to be ideally as low as possible, ISO 400 worked well enough for me because I’m typically up to 3200-6400 ISO when shooting game action and still come out with clean images.
As I took a few test shots to achieve the type of blur effect I was going for, I also had to be aware of what was happening on the court at that time. I needed to get players running on fast breaks or getting back on defense, it needed to be a transition play. As you can see in this image, I was able to capture players spread out across the entire court, and somehow it’s almost as if they’re draped around the SJB logo at center court. You can also see that all of the banners across the court are in sight, the lights above the court all look uniform, both basketball hoops are in the shot, and the @nikelosangeles handle is showing on the near side of the court.
I was able to achieve this shot handheld while having my camera attached to my BlackRapid Double Breathe Camera Harness which I use to carry my cameras by my side throughout every shoot or event. The in-body stabilization from the Sony Alpha cameras definitely helps achieve stable shots at lower shutter speeds without always needing the use of a tripod.
My final settings for the shot turned out to be:1/6-sec, f/6.3, ISO 400.
The Edit
In the sports and professional media world it’s very important to shoot images as close to “print ready” as you can, from straight out of the camera. Over the years I have grown the skill of making sure the majority of my images look how I want them to look in-camera, so if there’s any post-processing it can be very minimal. I have grown accustomed to editing my images from my phone through Lightroom Mobile. So once I sorted out my favorite images using Photo Mechanic, I imported them into Lightroom Mobile and started applying my edits.
For this image in particular, I did the initial edits that I typically do on every image, including: straightening, slightly cropping if needed, light adjustments of exposure, sharpening, clarity, dehaze, noise reduction, etc. The image looked a little flat out of camera, so all of the adjustments mentioned above just simply bring out the image a little more to help it pop and feel more immersive.
See more of Travis Ellison’s work on his Alpha Universe Profile and on Instagram @travietrav_dmv.


