In case you haven’t realized it, we are in the middle of three consecutive supermoons with this month’s reaching full peak on the morning of November 14 at 8:52 am EST.
For us photographers, that means an awesome opportunity to photograph the moon on either Saturday and/or Sunday evening as it rises nine minutes prior to sunset. More on why this is important in a bit
First, let’s talk about what makes a supermoon different from a regular full moon. I know folks are interested as I have been receiving a lot of emails on when and where to photograph it.
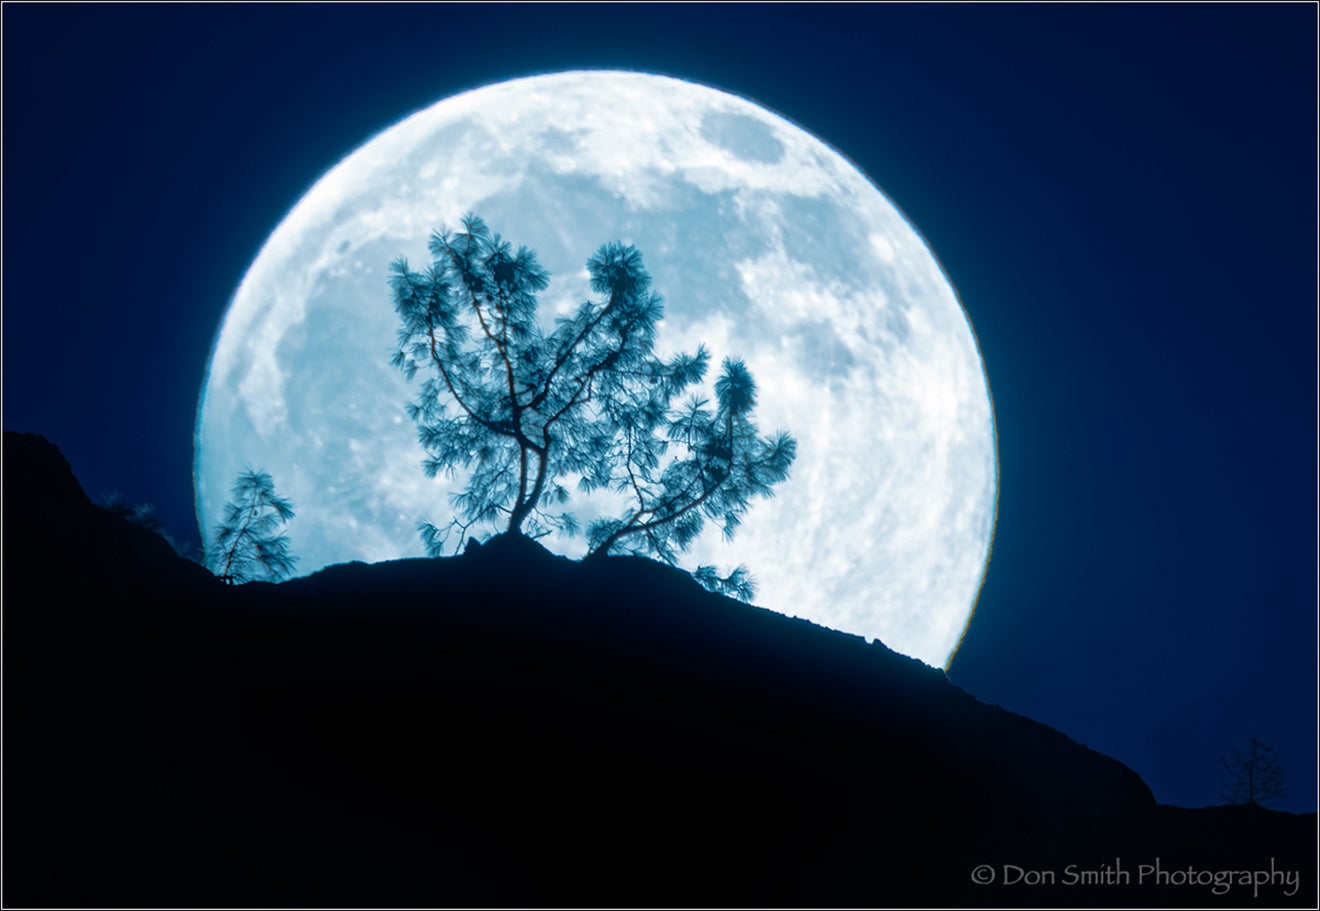
Sony α6000, 400mm f/2.8 + 2x converter (effective focal length – 800mm +1.5x crop factor – 1200mm), Metabones IV, f/10, 1/15th, ISO 200. Full moon rises over high peaks in front of gray pines at Pinnacles National Park, California.
Reality Check – Here is What Makes a Supermoon Different
“Supermoon” is an unofficial term coined in 1979 describing a full moon or a new moon that takes place when the moon is closest to the Earth in its elliptical orbit. That spot is called the “perigee“—a distance of 221,526 miles. When it’s a full moon at perigee, it is also called “super full moon.” A full moon occurs each month when the sun, Earth and moon line up with the moon on the side of the Earth opposite the sun; however, most full moons are usually not at perigee, that happens less than once per year (though this year we have three – October, November, and December).
However, the actual definition of supermoon isn’t as exacting, requiring it to be within 90 percent of the perigee distance to be considered super. So any full moon that is less than 223,694 miles from Earth is a supermoon.
In reality, the supermoon is only 14% larger than a non-supermoon but can be up to 30% brighter.
Why do I say “only 14%”? Think about it – let’s take an example of laying a coin on a table. Now, place a coin 14% larger under that coin, you would see it 14% larger in circumference but only 7% wider on any given edge of the moon. That is not a lot. Granted, 30% brighter is substantial, but brightness does not equate to size.
Now let’s use a photographic example. If I was to photograph a regular full moon with a 600mm lens, then photograph a supermoon with a 516mm lens (14% less focal length) the moon would look roughly the same size. However, if photographed on or near the horizon, visual clues such as trees would still make it appear a bit larger to us than a normal full moon – but not by much.
So hopefully you can see where I am going with this. The size of the moon in your image is really going to be determined by the focal length you use to capture that moon and by visual clues. Bottom line: the larger the focal length, the larger the moon will appear. Moreover, using an element such as the gray pine used in the image above will result in giving the moon some scale thus allowing our brains to make the connection between the size of the moon relative to that size of a known object.
BTW – the moon in the above image is not a supermoon.
Why is This Supermoon Special?
So why all the fuss about this upcoming supermoon? Well, this moon will be the largest supermoon since 1948. We will not get another this close again until November 25, 2034. This moon is also called the “Beaver Moon” because it arrives at the time of year (in the Northern Hemisphere) when hunters would set traps before the waters froze over, to ensure they had enough warm furs for winter. According to the Old Farmer’s Almanac, this moon is also referred to as the “Frost Moon.”
But let’s get back to why this moon will be cool to photograph. Again, don’t be all that swayed by the term “Supermoon.” Approach this shoot like any other full moon shoot and you will have success. Here is what I would recommend to include in your planning and execution.
Tips for Capturing the Supermoon
Tip #1 – Determining Where and When You Will Shoot
The logical first step in determining when to photograph this upcoming supermoon is to look at a moonrise/moonset chart. Then, do the same with the sunrise/sunset.
If you are planning to shoot moonrise, the best day will be this upcoming Sunday, November 13, as the moon will begin rising at 4:49 PST while the sun will be setting at 4:58 PST. If you have elevation gains then Saturday will work better. Remember, moonrise times and sunset times assume a level horizon.
You have to understand light values and why these times are important. First, realize that the moon is lit by the sun. Thus, if we wish to photograph the moon to match the light value on the landscape, we must look at when the rise or set times are closest to the sun rise or set time.
As stated, the best time for the moonrise will be this Sunday evening, while the best time for the moonset will be this Monday morning, November 14. The moon will set at 6:38am PST while the sun will rise at 6:44am.
The where part is up to you. I know areas where I live and will actually be in Yosemite helping teach a workshop with Gary Hart this weekend. I know Gary has already planned where he will place his group and I will keep that a secret.
Tip #2 – Check the Weather Forecast
Sounds like a given here, but it’s imperative that you have a relatively clear evening/morning to ensure success. If you can’t see the moon because of a storm or clouds, you will not have an image.
There is only one place I check for weather and that is the National Weather Service. I see amateur photographers regularly using their smartphones and various apps for weather information, but realize, that most of these reports start from the NWS. Why not go there to begin with?
If the weather report is not looking good for the area you live, think of heading to somewhere where the forecast is more favorable.
Tip #3 – Understanding the Ponzo Illusion
Italian psychologist Mario Ponzo (1882–1960) suggested that the human mind judges an object’s size based on its background. He showed this by drawing two identical lines across a pair of converging lines, similar to railway tracks. But the Ponzo illusion extends to other objects such as the relative size of the moon. Some researchers believe that the Moon illusion is an example of the Ponzo illusion, with trees and buildings playing the role of Ponzo’s converging lines. It has been proven that the moon (or sun) appears larger on the horizon to most people. But one must understand that this is simply an optical illusion. The moon is the same size on the horizon as it is high in the sky, but to us mere mortals, it appears much smaller when we gaze up. Why? Well, we have no known objects to compare its size to as we do on the horizon.
Trees and buildings are a reference point for us. By placing a moon next to them, as we can just after it crests the horizon, can give us an immediate sense of scale as to the relative size of the moon.
The earth’s atmosphere can change the color of the moon on the horizon but not its size.
Tip #4 – Use Long Glass
So how did I make this moon look so large in the above image? Simple – I used a super telephoto lens and placed the moon behind a known object – in this image – a gray pine at Pinnacles National Park.
First, I chose to use my Sony α6000 because it has a 1.5x cropped sensor factor. I then used a 400mm (connected with a Metabones IV adapter). Finally, I used a 2x Converter.
So let’s do the math: 400mm + 2x Converter = 800mm. Attach this setup to a camera with a 1.5x crop factor and you get the look of a 1200mm lens (or an 800mm cropped).
Bottom line – that’s quite a reach. Moreover, I have quite a compression factor working in my favor. As you all probably know, the more telephoto the lens, the more compressed objects appear.
For instance, this gray pine that was growing on the high peaks was about two miles from my shooting position. The moon was approximately 238,900 miles, yet when compressed with this telephoto setup, appears to be right behind the pine – again – an illusion.
BTW – The November 14, 2016 supermoon will be approximately 221,524 miles from Earth!
Tip #5 – Use a Tripod
The next step is to be sure you have a tripod built to handle the weight of the camera/lens setup that you plan to use.
I use Really Right Stuff tripods and ballheads and have different ones for different weights. Give RRS a call – they would be more than happy to recommend the proper setup to ensure your success.
You can also rent lenses and tripods. The key is to not place a large lens on a tripod that will not support the weight – it could result in blurry images of the moon.
Tip #6 – Use Software Like “The Photographer’s Ephemeris” to Plan Your Shoot
This may be the most important of all the tips I can give you. Simply stated, moonrise times and sunset times (or moonset times and sunrise times) are all based from a level horizon (think seashore). I would venture to say that most of you will not be shooting from a level horizon; thus, you will have to factor in elevation gains from where you are shooting to the elevation of where your moon will be rising.
Fortunately the is a free piece of software that will help you called The Photographer’s Ephemeris (the desktop version is free!). PhotoPills is another good app that can help you plan your shoot. There are videos available to help you figure this part out and I have one on my YouTube site that will explain it: Plotting A Crescent Moonset With The Photographer’s Ephemeris. Yeah I know, it’s a crescent moon but the same principles apply in determining elevation rises.
Tip #7 – Determining Correct Exposure
If you have made it this far, congratulations! Now, don’t blow the exposure! Fortunately, with digital, there is a simple technique to ensure you won’t blow the exposure on the moon.
First, it is imperative that you enable your Highlight Alert in your camera. This will tell you if you are overexposing the moon. If you are, the moon will blink back at you. Adjust your exposure until the blinkies stop – simple! This is a full moon, so you want detail in the moon and not a blown-out blob.
In the image above, I used an aperture of f/10. This was because I wanted to ensure that the gray pine and moon were both sharply in focus. Normally, if my horizon is miles away, I can shoot at a wide open aperture. Regardless, it is important to keep your shutter speed in fractions of seconds to ensure that the moon is sharp. You can always raise your ISO if unsure.
You can get a bit more technical and calculate the correct shutter using this information: the moon and stars shift one degree across the sky every four minutes, or a quarter degree every minute. Next, determine the horizontal field of view of your lens (on a full frame camera). There are many tables online.
The great Galen Rowell in his classic book Mountain Light, used an example of a 500mm lens. The horizontal field of view of a 500mm lens on a full frame sensor is four degrees; thus, it would take 16 minutes for the moon to move completely across the frame. Eight seconds was the longest exposure he would use for this setup.
Remember, this supermoon will be about 30% brighter than regular full moons so you should be in fractions of seconds unless you are using a small aperture.
Hopefully this covers it. With some proper planning and a lens 200mm or longer, you will have an opportunity to make an amazing image of the supermoon this Sunday – plan carefully and have fun!
Note: This article also appeared on Sony Artisan Don Smith's Nature's Best Blog. It is reprinted here with permission.

