I started to shoot environmental portraits before I knew they were a thing. My roots as a photographer are in shooting fashion and beauty, celebrity portraits came later, and I cut my teeth early in my career running around the streets of NYC shooting models from agencies like Next, Ford, Elite and Wilhelmina. For these model tests, now I’m talking really early in my career, I would run around my neighborhood, New York City’s Meatpacking District, with just a camera in hand, my model and makeup artist in tow.
This was also when they actually did meatpacking in the Meatpacking District, so most of the buildings and streets in the area were pretty quiet by about 11am. It was during this period of my career that I began to hone the skill of finding the light, as opposed to using a reflector or flash fill or whatever tool to shape and create whatever quality of light I was seeking. It’s a skill I use to this day, no matter what I’m shooting. I should caveat this by noting that when I am shooting commercial or editorial projects for a paying client, I have all the silks, flags, frames and bounce, etc., that I could possibly need to ensure consistency and repeatability in my work.
But the point of what I’m discussing here is my preference to use no tools at all and to just find the light using the tricks and techniques I’ve learned over the years.
Lighting: City Canyons Become Daylight Studios & The Power Of Open Shade
For example, one of my favorite locations in the Meatpacking District was to shoot under the overpass of the Highline elevated railroad tracks. On most days during the warmer months, if it was before about 4pm, I could place my model in certain spots under the Highline overpass and she would just glow. I loved how the light would become more directional, lining up horizontal really, and unflattering top-light would disappear. Shoot with a wide aperture and the effect was reliably beautiful. This is a shot from back then, made in the exact location and method described above. It dates to well before there were digital cameras.
Really though, the Meatpacking District in NYC was a great place to refine the skill of finding flattering light because at the time, with the buildings all not taller than a few stories and with overhangs over many of the sidewalks from which the purveyors of fine meats would hang their wares, light was just bouncing around everywhere. Those cobblestone streets were like a natural daylight studio.
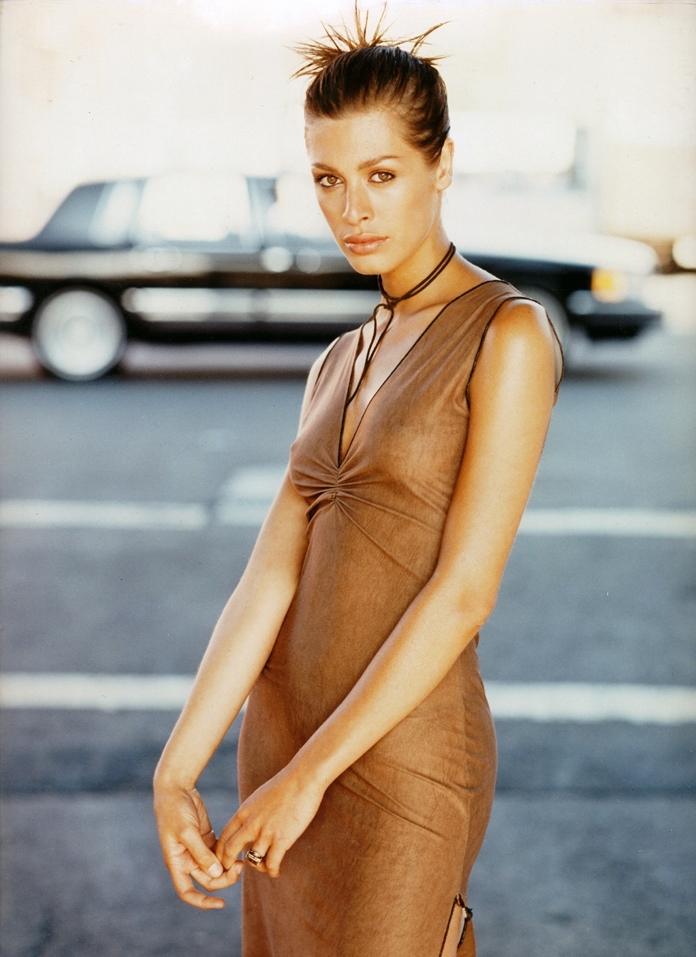
One of Jeff Berlin’s photos from the old days of the Meatpacking District. Shot on film.
Much more recently, I was in Ireland with fellow Sony Artisan Robert Evans. He had asked me to join him to shoot a wedding in London and we then took a few days’ holiday in Ireland to just drive around and make photos.
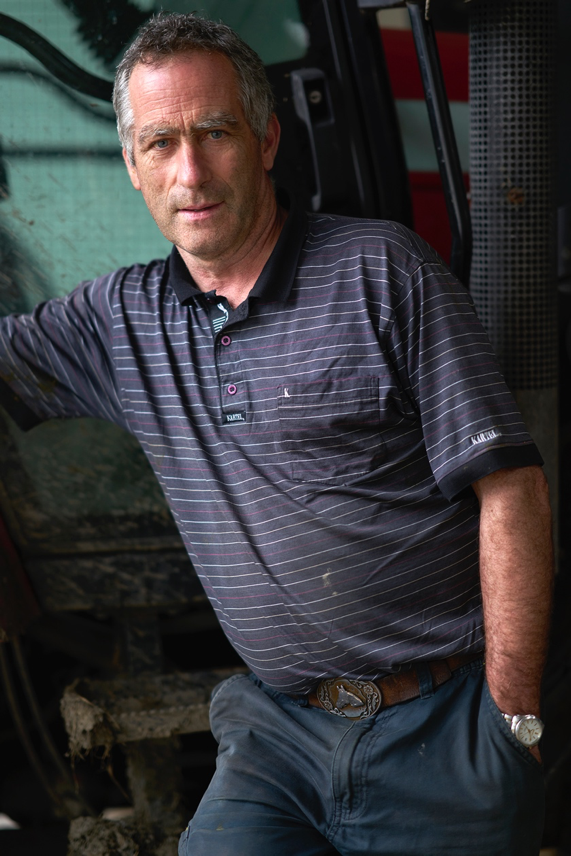
If you’ve ever driven around Ireland, which is extraordinarily beautiful, and green, besides driving on the ‘wrong’ side of the road, you’ll know it’s quite easy to get turned around, and that’s what happened on the way to our bed & breakfast in Labasheeda. But I like to think that things happen for a reason and it was by getting lost that I was able to finally check off of my list one of my goals for the trip, to do a proper portrait of someone I meet randomly during our travels. Except for major motorways, most of Ireland seems to be connected by a web of two-lane roads. As we meandered our way to Labasheeda, a small village not too far from the west coast of Ireland, I came round a turn and saw a gravel driveway and some people. Figuring local knowledge could help us get back on track, I pulled in.
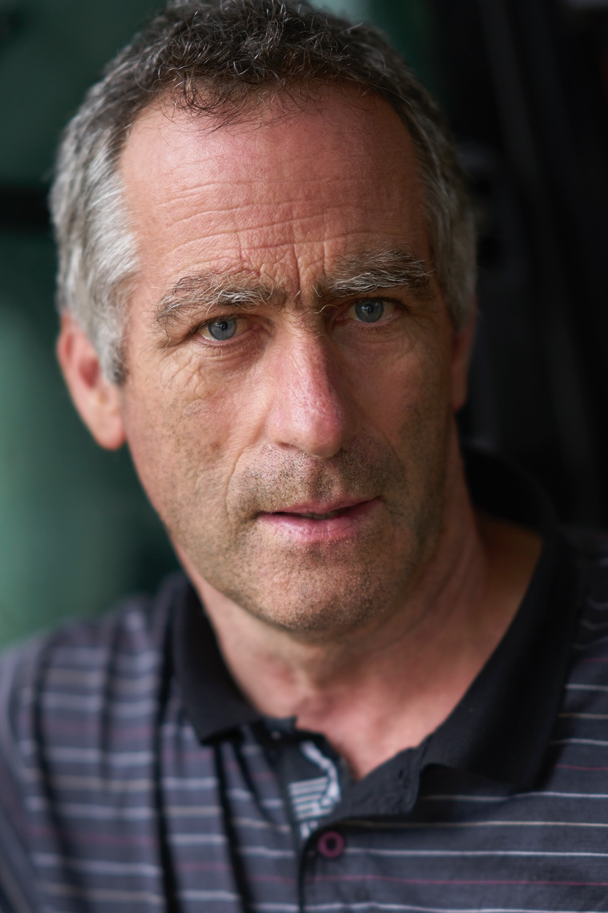
Turned out we turned into a farm. As Robert and I sat in the car getting directions from a farmer named Sean Culligan, his boy, Diarmuid, hovered nearby. Sean had a great look, kind of like the farmer version of Mel Gibson, and he seemed friendly enough so I asked if I could do a quick portrait of him and his son, who was wearing a football (soccer) jersey for what I assumed was a local team, so that was cool, too.
For these two quick shots I broke out my α7R II and 85mm f/1.4 GM lens. Not only was the light dropping - it was later in the day – but also I wanted all the benefits inherent to a fast 85, like the flexibility to shoot a close portrait or back away a bit, and the shallow depth of field I’ll get with the aperture wide open. That I could shoot at f/1.4 also allowed me to dial down my ISO to a lower number, for the win.
I never travel with hand-held reflectors, a flash or other light modifiers. I don’t usually like the look of flash fill from Speedlights anyway, so that’s just not an option for me. When I shoot environmental portraits, like for my rodeo project and often, for celebrity portraits, I use my camera and only my camera. I find the light and shoot what I find. It usually works out pretty well.
Sony α7R II, Sony FE 85mm f/1.4 GM lens. 1/60-sec., f/1.4, ISO 100
Sony α7R II, Sony FE 85mm f/1.4 GM lens. 1/125-sec., f/1.4, ISO 320
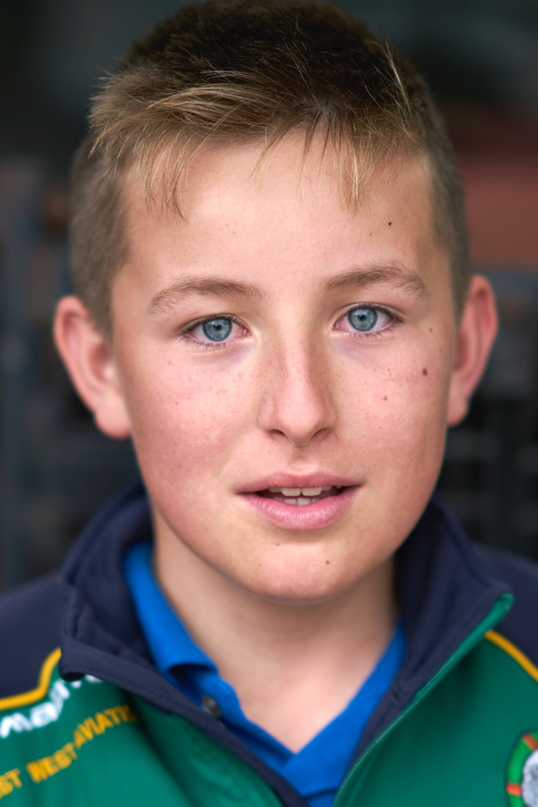
Diarmuid trying to not smile. Sony α7R II, Sony FE 85mm f/1.4 GM lens. 1/160-sec., f/1.4, ISO 100
These were shot only a few feet from where we pulled over in Sean’s drive. Whenever I shoot environmental portraits I look for overhead cover because I like the quality of light under those conditions. This time, I found that cover at the shed where Sean parks his tractor. It was the best spot for me to find my light and shoot some quick and painless portraits.
I never want to inconvenience my subjects when they’re doing me a favor, like Sean did here, so I think fast and work fast. I shot for a total of maybe, three minutes, shooting a couple variations, and I never leave anything to chance. When I shoot I keep a constant dialog with my subjects and this time, talked Sean into his body position and facial expression as it was clear he was not used to being in front of the camera.
Content Contrast: Look For The Opposite
The rodeo is another situation where I incorporate all my tricks to achieve my desired results, and how I fell into rodeo sort of set the stage for how I have shot it ever since.
Long-ish story short, I used to fly airplanes and write about it for magazines, and one summer about 10 years ago, for an article, I flew a professional rodeo cowboy to rodeos throughout the American West during the week they call Cowboy Christmas.
Rodeo is achingly photogenic, is rooted in the history of the American West, and the people are fantastic. And that week, while my cowboy friend, a champion calf and team roper, was rodeoing, I was running around the rodeo grounds making pictures. It took almost no time for me to gravitate to focusing more on the people, who were all dressed western, but for them, that’s who they were. This was not dress-up, and that’s what I loved and wanted to capture. Every now and then I’ll shoot some of the action in the arena, the bucking horses and bulls, but really, why shoot what everyone else is shooting. That’s no way to distinguish oneself.
Really though, the fashion photographer in me loved the fashion, the style, the faces, that is rodeo, and thus began a very fun and rewarding ongoing personal project that I pursue to this day.
The Cirrus SR22 airplane I flew for those rodeo trips isn’t very big – think 3-series BMW with wings – so piling into the airplane with tons of photo gear was not an option. Nor is it practical to walk around the rodeo grounds with all kinds of gear, so again, it’s just me, my Sony camera, and the light that I find.
It’s important to also note that the best cameras and gear in the world won’t do much if one doesn’t have the access to really get IN and behind the scenes and be a part of whatever world it is you’re covering. Traveling with my cowboy friend, I immediately had that access and since then, have leveraged relationships to ensure the access I need to get the shots I want.
And it doesn’t get more behind-the-scenes than up by the bucking chutes where cowboys who compete in Rough Stock mount broncos and bulls the size of small Volkswagens.
Things happen fast at the chutes so it’s important to be decisive when shooting there. Then again, if you’re ever shooting with a client on set, there is no better time to be decisive than then. So in these situations, I work fast and think fast. And since most rodeo photographers are all about shooting the action, often, my goal is to try and find the opposite - peace, tranquility and stillness in the frenetic action. Every now and then, like in the photo below, I’m able to capture the moment as a cowboy contemplates his next wild ride. I will often talk their energy down a bit to get them to relax just a bit more, and turn them this way or that for the better light.
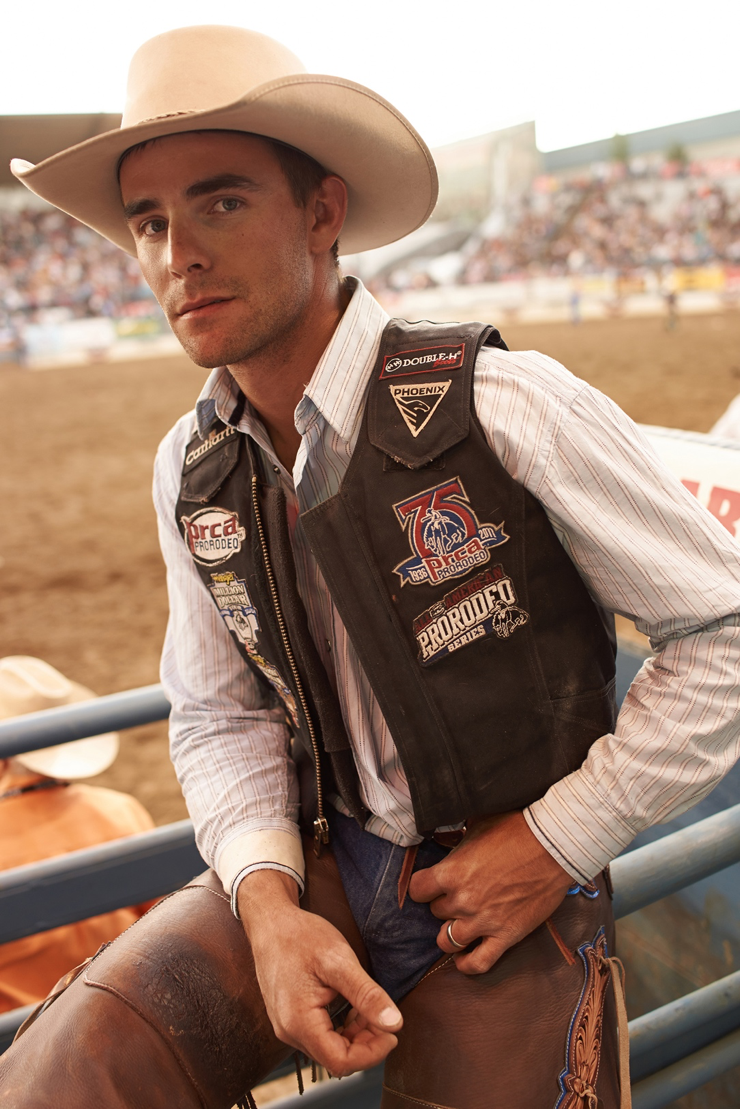
Sony RX1R II. 1/80-sec., f/2.5, ISO 100
So you may be thinking, But what about when my subject is wearing a hat, like a cowboy hat? In the photo above, taken at the bucking chutes during a Reno Rodeo evening performance, even if I wanted to, I don’t have the option to bring anything but a camera into that very busy, and sometimes dangerous, area, no reflectors, no nothing, but to me, that’s fine.
Over the cowboy’s shoulder part of the grandstand is visible. The sun sets behind that grandstand, so this shot is largely backlit with some highlight from the sun side. Here though, open shade gives me a much softer and more flattering light, and fill, than a reflector. And stylistically, the look of a photo filled with a flexfill-style reflector is something I never go for.
As you might imagine, when shooting by these bucking chutes during a rodeo I don’t have time for trial and error. I usually have well under a minute to get these shots. In that time, I have to do what I can, with what I’m given, to get what I can. For this shot I may have asked the cowboy to tilt his hat up a bit, and I did turn him to capture the light you see in the shot.
Keep Modified Light Natural Looking
Below is another shot from a recent magazine editorial, also with a cowboy hat, but this was different because here I could totally control the conditions and was specifically going for beauty light.
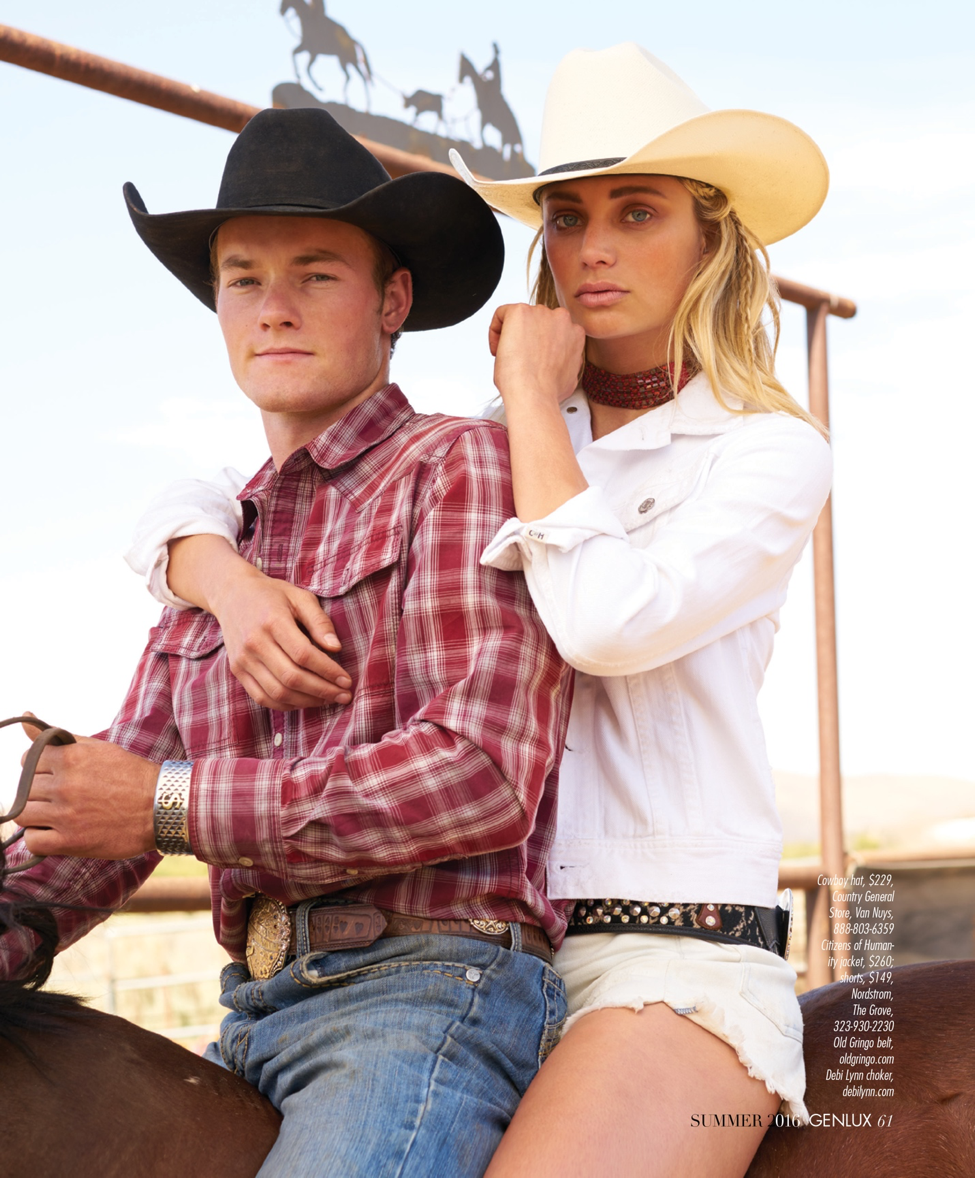
If there’s one thing that I never do, ever, it’s kick light under the brim with a reflector or flash. Not only does it, more often than not, create an unflattering bottom’y light, it communicates to a cultured eye a certain mediocre-level of sensibility and that the shooter probably doesn’t know when too much is too much.
I know this may sound harsh, but no one evolves without a dose of frank criticism now and then, so here goes… over-fill under a hat, or over-fill anytime, or over-reflect or over-flash fill, and your images will scream amateur. Unless that’s the look you’re going for, to which I’d ask, Why?, I’d say, why not aim higher.
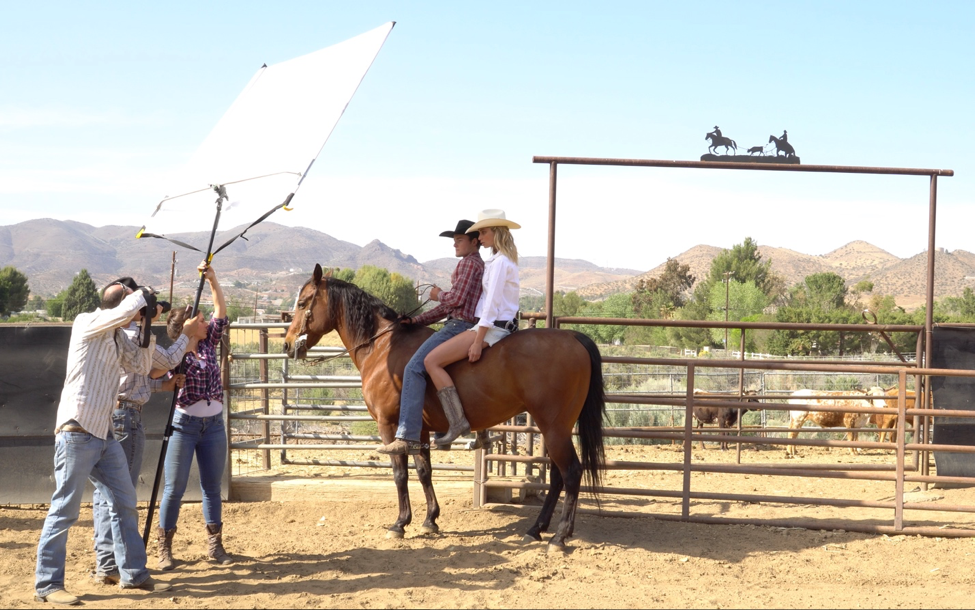
So here’s a behind-the-scenes shot from when I was shooting that magazine editorial. You’ll notice that my assistant is holding a silk to soften the light on my models. I’m creating a flattering open shade that gives me the clean and pretty effect I was going for. Just like with the cowboy at the rodeo in the image above, angle of the head, of the hat, and how the hat sits on the head, are critical to making this all work. Finding, or making a directional light that will look natural yet fill in under the hat, is the final trick. It’s all very subtle but natural-looking fill that doesn’t look like fill will transform for the better how your photos look.
Light Is Always Changing So Watch Carefully & Experiment
The Reno Rodeo is an outdoor event where the light just bounces around like crazy. There are so many good spots to shoot there that not once have I ever felt like I was hindered by not having with me anything but a camera. Indeed, I’m continually scouting the area for where those sweet spots of light may be at any given time. Of course, as the sun passes overhead, that changes continually. At one hour it might be bouncing off this wall or that, but not later. At other times during the day, there’s this one spot behind the indoor arena where I can make my subjects practically glow. I mentioned the overhead cover I’m always looking for and here it is again in a covered series of stalls where people board their horses during the rodeo. It’s important to note that not all overhead cover will work as advertised. The tricks are figuring out how far under the cover to go and which angle from the sun will give the best result. For this, trial and error, and a patient subject, are your friend as you figure this out for yourself.

Sony α7R II, Sony FE 55mm f/1.8 ZA lens. 1/2000-sec., f/1.8, ISO 100
At the rodeo I don’t have the luxury of trial and error, so I fall back on what I know works--shooting under an overhang and making use of the ambient light reflecting all around. That's what I did in this shot of a cowgirl named Haley, who happens to be a champion roper and barrel racer.
My “Rules” For Environmental Portraits
Ultimately, for the types of environmental portraits I make, where I strive to use as few light modification tools as possible, or none at all, I have settled on a few rules that seem to work for me. They might for you, too.
Of course, my work, and what I impart here, are only consistent with my own sensibility, and with photography, sensibility is everything. Knowing what’s good and what is not is everything. And thus, I come to rule number one.
1, Educate Your Eye. The more educated the eye, the more consistently better choices, and results, you will make and achieve.
2, Look At Other Photographers’ Work. Know who came before you.
3, Always Have A Camera. As your eye becomes more educated, it will get to a point that your eye will never turn off. Take advantage of that by always keeping a camera with you.
4, Start A Conversation. If you’re a portraitist or want to be one, don’t be afraid to break the ice. Talk to strangers. It worked for me in Ireland.
5, Communicate With Your Subject. Don’t be afraid to ask your subject to do what you want them to do to make a better picture. My pictures don’t just happen and neither will yours. To that end, keep communicating with your subjects throughout the time they are in front of your camera.
6, Look At The Ambient Light Around You. Start to try and see light bouncing around. Is there an alcove, a wall, an alley, an overhang? Use them to your advantage and find that perfect light.
7, Don't Overdo It. Know when too much is too much. Don’t over-light. Don’t over-fill. Don’t over flash-fill. Don’t over-reflect. It will look amateurish.
8, Film Is Cheap (and pixels are free). Keep shooting. I have said this and lived this, throughout my career, whether I was shooting film back in the day, or digital now.
9, Practice, Practice, Practice. Practice on your friends if you don’t have access to models. Indeed, it’s probably better to try new things on friends than when more is on the line.
10, Don’t Be Creepy. Enough said.
11, Show Your Shots. Have a gallery of your work on your phone to show people what you do. It helps legitimize you to people with whom you’d like to collaborate.
12, Learn To Work Quickly. Having time in photography is a luxury. I never expect to have it and I often don’t.
13, Have Fun. Seriously, when you're having fun, the person in front of your camera will too.

