


Annalise Kaylor (@annalisekaylor) is a documentary photojournalist with a special focus on wildlife and conservation. She says her goal is to bring people closer to the natural world, both through her photography and video work and through a better understanding of the subjects in front of her lens. Annalise values authentic moments where the wildlife is not threatened by her presence. Throughout the course of her career, she has tested out a massive amount of different gear, focusing on the features she needs to be successful in conservation photojournalism. She's settled on the Sony Alpha 1, a pair of zoom lenses, a fast G Master telelphoto prime, along with a teleconverter to get more from those lenses. Keep reading as she take us through her bag for wildlife photojournalism.
Product Preview – In This Article You’ll Find:
-Sony Alpha 1
-Sony 400mm f/2.8 G Master
-Sony 200-600mm f/5.6-6.3 G
-Sony 24-70mm f/2.8 G Master
-Sony 1.4X Teleconverter
-Sony VG-C4EM Vertical Grip

Annalise Kaylor's gear for bird and wildlife photography

Annalise Kaylor in the field
Camera
Sony Alpha 1: When I’m on assignment, I don’t have the option of failure and I rarely have the luxury of time; I have to come back with the images, on deadline. There are no second tries. Having a reliable setup that can endure extremes like 99% humidity in the tropical rainforest to the -4-degree temps and winds of winter is non-negotiable. I’ve put Sony Alpha 1 through some of the most challenging lighting and weather conditions photographers can experience and it has never failed me.

Photo by Annalise Kaylor. Sony Alpha 1. Sony 400mm f/2.8 G Master. 1/2000-sec., f/2.8, ISO 250
As a conservation photojournalist, I control almost nothing about what I am photographing. I do not control the weather, and I certainly do not control the wildlife or other aspects of natural world. I have to work with whatever Mother Nature throws my way. I also often need to seamlessly move in between photo and video, which my Alpha 1 allows me to do with one touch of a button.
Because so many aspects of my work are not things I can control, I rely on my Sony Alpha 1 to help me control as much as I possibly can. As a photojournalist, I do not use Photoshop in my work and my post-processing efforts are limited to essentially anything I could do if I were working in a darkroom with film – a little color correction, some dodging and burning, and a crop or straighten. This kind of ethical consideration is something I think will become only more important in the new world of AI-everything.
It isn’t often touted as a key feature of mirrorless cameras, but one of the things I rely upon most in my work is the live histogram in the viewfinder of my Sony Alpha 1. I work in ultra low-light scenarios for a lot of my work, meaning that I’m often pushing my ISO high into the 20,000 ISO range is not uncommon – I work with ISOs much higher than many other photographers would ever dream of trying with their cameras.

Photo by Annalise Kaylor. Sony Alpha 1. Sony 400mm f/2.8 G Master + 1.4X TC. 1/1600-sec., f/2.8, ISO 1600
The live histogram ensures I’m pushing my exposure as far to the right as possible without blowing out my highlights. Gone are the days when photographers had to take a shot, review a histogram and adjust, then take another shot and see where it landed. In wildlife photography, by the time I do that I could miss the action. Being able to see the histogram as I’m working ensures I have spot on exposures every time - something that is ultra-helpful when you have a subject like a bald eagle, with a dark body, but a bright white head. They both have to be exposed well.
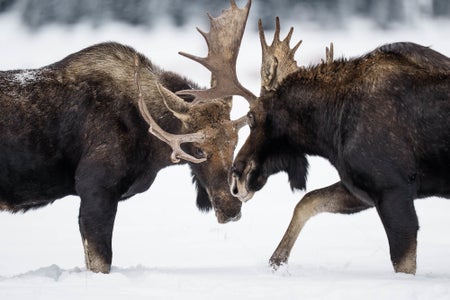
The other benefit is being able to change that live view histogram from the luminance histogram (exposure) to the RGB histogram (color channels). When I’m working in winter, I have two considerable challenges in working with light. The first is that I’m exposing properly to make sure I still have details in the snow, and the second is making sure I don’t blow out the blue channel on my histogram. Red and green light are more efficiently absorbed by the snow than blue light, which bounces off the snow and reflects like crazy. If you’ve ever taken a cell phone photo in lower light in the wintery snow, you’ve likely seen this blue or blue-gray wash of color all over your frame. This is because the blue channel is blown out. The live RGB histogram ensures I can adjust my Kelvin white balance to compensate for that blue and make sure I’m doing justice to my subject.

Photo by Annalise Kaylor. Sony Alpha 1. Sony 400mm f/2.8 G Master + 1.4X TC. 1/4000-sec., f/4, ISO 2000
Just like trying to recover with the highlights blown out is not possible, it’s not possible to recover that much white balance in post-processing. Again, this is a seemingly small piece of technology that makes a huge impact on the way I work and the results of that work.
Lenses
Sony 400mm f/2.8 G Master: It’s hard to choose what I love most about my Sony 400mm f/2.8 G Master lens. This lens lives on my camera about 95% of the time. It’s incredibly well-balanced and light – I can hand-hold this lens for hours on end during a 14-hour day in the field. Its wide aperture makes it ideal for low-light photography, too.

Photo by Annalise Kaylor. Sony Alpha 1. Sony 400mm f/2.8 G Master. 1/320-sec., f/3.2, ISO 5000
The sharpness of this lens, especially combined with the accuracy of the eye tracking capabilities of the Alpha 1, is an unbeatable combination. When you’re photographing puffins flying by at 55mph and hitting a 90% or better success rate, you know you’ve got next-level camera gear in your hands. And, the bokeh is beautifully creamy and ethereal, something that becomes even more important when you can’t enhance it in the editing process.
Unlike many wildlife photographers, I almost always photograph at f/2.8, or as wide open as possible. We, as humans, view everything at an aperture of around f/2.1. We don’t see our world at f/8.0 except in the brightest and most perfect light, and as such, I want my photos to represent how we actually see the world and I couldn’t do it without this lens. Even if I decide to stop down to a higher f-stop, having a f/2.8 lens is the perfect companion to the Alpha 1 autofocus system. My camera still acquires focus with f/2.8 even when stopped down, so the two together mean my critical focus is acquired faster and more accurately.

Photo by Annalise Kaylor. Sony Alpha 1. Sony 400mm f/2.8 G Master. 1/2500-sec., f/2.8, ISO 3200
Sony 200-600mm f/5.6-6.3 G: Having a good, all-purpose zoom is a must for any photojournalist and this range is ideal for any time I’m working in a run-and-gun situation. I love having the flexibility of capturing an environmental portrait first and zooming in seconds later for a tight portrait, for example.
While I never mind “zooming with my feet” and getting closer with my 400mm there are plenty of situations where a high quality zoom like the 200-600mm pays off. For example, a couple of years ago when I was working in Yellowstone National Park, I had this gorgeous coyote walking through the blowing snow right toward my lens. Because of the flexibility, I was able to grab a variety of photos from various distances and compositions, which is important when you sell your work to magazines, like I do. Editors like to have a nice mix of verticals and horizontals to work with.

Photo by Annalise Kaylor. Sony Alpha 1. Sony 200-600mm f/5.6-6.3 G. 1/2500-sec., f/6.3, ISO 400

Photo by Annalise Kaylor. Sony Alpha 1. Sony 200-600mm f/5.6-6.3 G. 1/1600-sec., f/6.3, ISO 160
Having the zoom also meant that once the coyote moved over to some deeper snow, I had only to roll over to my other side and start photographing her with a brand new scene.

Photo by Annalise Kaylor. Sony Alpha 1. Sony 200-600mm f/5.6-6.3 G. 1/2500-sec., f/6.3, ISO 400
My Sony 200-600mm f/5.6-6.3 G lens is also my all-purpose video lens simply because of the versatility. It also has an incredibly smooth focus ring, which is important for manually pulling focus for video work.
Sony 24-70mm f/2.8 G Master: Creating set and setting is why I keep the Sony 24-70mm f/2.8 G Master lens in my bag at all times. So many of the stories I tell are unique to their environments, and being able to show that environment is what can really draw someone into the world of wildlife. A moose in Maine, for example, lives in a very different environment than a moose in Wyoming does and that Wyoming moose has a very different world than a moose in Alaska. Wide photos with this lens help communicate those differences.
Accessories
In conservation and wildlife work, access is everything. If you can find the animal or subject, you can’t photograph it. This means that my “bag” extends far beyond my camera gear.
Floating Blind: Floating blinds change everything if you like to work from the water as a wildlife photographer, especially for birds. Unlike my kayak, which I also love to use, my floating blind makes me appear like I’m any other muskrat hut or clump of vegetation on the water.

Photo by Annalise Kaylor. Sony Alpha 1. Sony 400mm f/2.8 G Master. 1/2500-sec., f/2.8, ISO 1000
The birds and wildlife don’t see my human shape, they don’t see me moving, and I blend into their natural world seamlessly, so this gives my unparalleled access to unique moments while preserving ethical behavior and not disrupting any of their behavior.
Earlier this year, I was photographing Eared Grebes and Western Grebes in the prairie pothole region of North Dakota. While I slowly moved about the waist-deep water in my blind, I witnessed intimate courtship dances to nest building to even breeding itself, all just meters from my lens. I couldn’t have seen or photographed any of that without my blind.
Sony 1.4X Teleconverter: For that work in North Dakota, I also used my Sony 1.4X Teleconverter on the 400mm lens. Sony makes the best teleconverter I’ve ever used. Pairing it to the 400mm means I’m now shooting at 560mm with f/4 wide open. For me, that means I don’t need to own a 600mm lens just yet. The extra crop ability from the 50.1 megapixel camera gives me a bit more to work with there, too.

Photo by Annalise Kaylor. Sony Alpha 1. Sony 400mm f/2.8 G Master + 1.4X TC. 1/4000-sec., f/4, ISO 500
Sony VG-C4EM Vertical Grip: I create a lot more verticals than the average wildlife photographer, largely because I do assignment work and license my images to publications and other media. They need verticals for cover photos, but also for the way we consume social media these days. Having the Sony vertical grip means two major things for me: first, I’m not throwing my arm around like a “chicken wing” to make vertical photos and the other is that it doubles my on-board battery life.
Chest Waders: I have two pairs of chest waders that I use for different seasons and reasons and they’re handy for any photographer who gets dirty with their work.
When I’m out photographing coastal brown bears in Alaska, my Simms chest waders keep me warm and dry, but they also keep me clean. I spend a lot of time working from the ground and these bears are often roaming across a sandy beach or lunging through neck-deep water. After a morning of photographing bears in the rain and sand, I simply hose off my waders and step out of them before going into lunch. No need to change clothes or shower - I’m ready to go.

Photo by Annalise Kaylor. Sony Alpha 1. Sony 400mm f/2.8 G Master. 1/3200-sec., f/2.8, ISO 2500
Being able to stand waist-deep in the water gives me a vantage point a lot of other photographers don’t have. I can be right at eye level with a sow brown bear as she lunges straight toward me while fishing for salmon. Eye level or lower is how we show strength and power in wildlife photography, and my waders get me into places others may not go.
For very cold water work, I wear a breathable, insulated pair of waders or a dry suit. They are far more comfortable than bulky neoprene waders and they cinch down in all the right places for the female form.
Shaving Brush: Sand and camera gear is a woeful combination, so I keep a $12 shaving brush in my bag at all times. It’s perfect for when you have thousands of sand grains on your lens, wiping them off with a flick of the wrist. I strongly prefer this to a dust blower for external debris.
Really Right Stuff Tripod: When I first bought this tripod, it was one of the very few carbon fiber tripods without a center column on the market. Being able to get low to the ground is a MUST in wildlife photography, and center column not only inhibit how low you can go, they aren’t even that stable if and when someone would use that feature. This tripod has been in salt water, fresh water, marshes and swamps, snow, rain, and desert and endured it all.
Skimmer Ground Pod II: It might just look like a frying pan with a tripod mount, but my Skimmer Ground Pod is my favorite way to photograph on a beach or mud or any place where I want a tripod but don’t have room (or the energy to properly clean my tripod afterward).

Photo by Annalise Kaylor. Sony Alpha 1. Sony 200-600mm f/5.6-6.3 G. 1/1250-sec., f/6.3, ISO 6400
Wimberley WH-200 Gimbal Head: No bells. No whistles. Just a solid gimbal head that works. While most of my still photography work is hand-held, there are times when the bulk of my work is just waiting around for the action to start. I use this gimbal head on my tripod, but also in my floating blinds and also on my ground skimmer pod.
Think Tank MindShift Elite 45l Bag: Now known as the Think Tank BackLight Elite 45L backpack, this is the literal bag that stores it all. Like most photographers, I’ve gone through more camera bags than I should ever care to admit and it took years of frustration before I landed on this bag.
The main reason I bought this bag is that I can carry my Sony Alpha 1 with my Sony 400mm f/2.8 G Master lens attached inside. AND I can pull it out of the top ready to go. I’ve scoured the market for a backpack that will open from the top like this with a super telephoto lens attached to a camera inside. Being able to pull my camera out with my lens attached and be photographing a few seconds later makes all the difference when time is of the essence, as it often is in wildlife work.
See more of Annalise Kaylor’s work on Instagram @annalisekaylor.

